How to Use Property Wrappers in Swift

Swift 5.1 introduced a concept of property wrapper. Property wrappers is a mechanism that allows developers to centralize code for modifying the variable properties during setting and getting their values.
For example, as soon as the variable is set, you might want to apply some changes to its property (As in setting translatesAutoresizingMaskIntoConstraints property on UIView instance to false for example) or use a custom transformation and get the transformed value the next time you access it (For example, converting the date string into Date object).
Property wrappers allow you to create a wrapper for such custom changes, centralize the logic, and return the modified value with complete abstraction.
Let's try to understand how property wrappers work with examples,
Setting translatesAutoresizingMaskIntoConstraints to false for UIView instances
One of the major pet peeves of all iOS developers is that, as soon as they create an UIView instance, they need to set manually translatesAutoresizingMaskIntoConstraints property on it to false. This is not only cumbersome, but sometimes when you forget to do it, your layout will break and the console will throw several warnings for forgetting to set it to false.
With property wrappers, we can centralize this logic in just one place. As long as any UIView instance is using this wrapper this property will automatically be set to false when it's first initialized or it is assigned the value of another UIView instance.
To begin, we will create a new struct with @propertyWrapper annotation to indicate that this struct represents a property wrapper. We are going to use it on any UIView instance so that we will use the generic type T of type UIView.
@propertyWrapper
struct Autolayout<T: UIView> {

}
Now, in the next part, we will add a customization code inside initialization where as soon as the variable is initialized with this annotation, we will set its translatesAutoresizingMaskIntoConstraints property to false.
@propertyWrapper
struct Autolayout<T: UIView> {

    var wrappedValue: T

    init(wrappedValue: T) {
        self.wrappedValue = wrappedValue
        _setAutoOff()
    }

    func _setAutoOff() {
        wrappedValue.translatesAutoresizingMaskIntoConstraints = false
    }
}
This works fine during initialization. But what if another value is assigned to our UIView instance after initialization and that property associated with that value isn't decorated with Autolayout annotation?
In that case, we need to detect any later change in property with didSet observer and call _setAutoOff to manually change the value of translatesAutoresizingMaskIntoConstraints to false.
@propertyWrapper
struct Autolayout<T: UIView> {

    var wrappedValue: T {
        didSet {
            _setAutoOff()
        }
    }

    init(wrappedValue: T) {
        self.wrappedValue = wrappedValue
        _setAutoOff()
    }

    func _setAutoOff() {
        wrappedValue.translatesAutoresizingMaskIntoConstraints = false
    }
}
Demo
Now that our property wrapper is ready, let's test it.
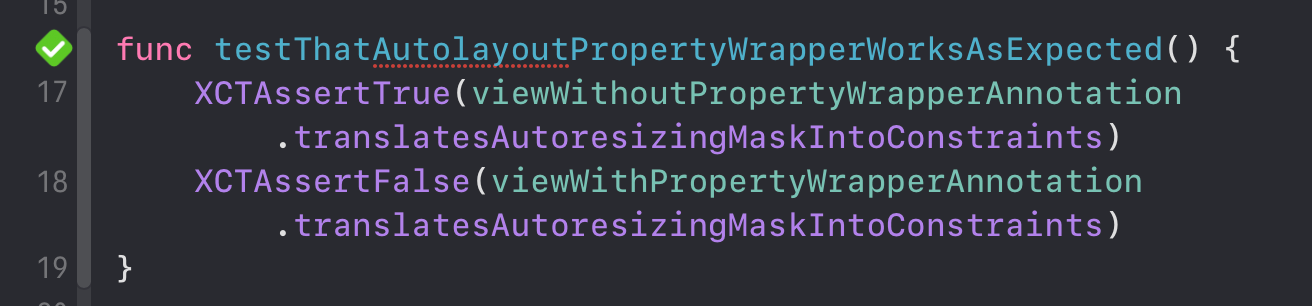
First, we will create an UIView instance without Autolayout annotation and another example with annotation. Then we will verify translatesAutoresizingMaskIntoConstraints property on both of them. The value of this property should be true on the former and false on the latter.
var viewWithoutPropertyWrapperAnnotation = UIView(frame: .zero)
@Autolayout var viewWithPropertyWrapperAnnotation = UIView(frame: .zero)

func testThatAutolayoutPropertyWrapperWorksAsExpected() {
    XCTAssertTrue(viewWithoutPropertyWrapperAnnotation.translatesAutoresizingMaskIntoConstraints)
    XCTAssertFalse(viewWithPropertyWrapperAnnotation.translatesAutoresizingMaskIntoConstraints)
}
If we run the tests, we will find that the tests passed successfully.
Let's look at another example with a slight variant to show the application of property wrappers.
Converting String to Formatted date string
In this example, we will create a custom property wrapper to convert a given string into a pre-defined date format string. If the input string is a valid date, we will return the input string. If it does not represent a valid date, our property wrapper will return the nil value.
Since we are only dealing with strings, a property wrapper will take initial value that conforms to StringProtocol. During initialization, it will validate the string and assign the input string to the private property representing the variable or nil, if the input string is not a valid date.
@propertyWrapper
struct DateFormatterFilter<T: StringProtocol> {

    private var _value: T?

    init(wrappedValue value: T?) {
        self._value = self.filterInputDateString(value)
    }

    var wrappedValue: T? {
        get {
            return filterInputDateString(_value)
        }
        set {
            _value = newValue
        }
    }

    private func filterInputDateString(_ value: T?) -> T? {
        let dateFormatter = DateFormatter()

        dateFormatter.dateFormat = "yyyy-MM-dd"
        if let stringValue = value as? String, let _ = dateFormatter.date(from: stringValue) {
            return value
        }
        return nil
    }
}
Please note that we are calling filterInputDateString twice. Once during initalization and other time when we update the value of variable under property wrapper.
Now that the wrapper is ready, let's write some tests to verify whether it functions as expected or not.
We will use valid and invalid dates to make verify the property wrapper produces correct output. We will also use one more invalid date string without a property wrapper. Since it won't undergo formal validation, it should always have a valid value irrespective whether it represents a valid date or not.
@DateFormatterFilter var validDateString = "1990-10-20"
@DateFormatterFilter var invalidDateString = "1990-100-20"
var invalidDateStringWithNoWrapper = "1990-10-200"

func testThatDateFormatterFilterPropertyWrapperWorksAsExpected() {
    XCTAssertNotNil(validDateString)
    XCTAssertNil(invalidDateString)
    XCTAssertNotNil(invalidDateStringWithNoWrapper)
}

As you can see all our tests passed with the expected result.
Summary
So this was all about knowing property wrappers in Swift. They were first introduced in Swift 5.1 and have been gaining propularity since. They are an excellent way to centralize transoformation logic, avoid repetition and performing validation on any input as long as input conforms to property wrapper conditions and is decorated with annotation.
Are you using property wrapper in your application? Did you find it hard to use them for the first time? Do you find any paint points using them? If you were unfamiliar with it before, did you find this article useful to be able to create your own custom property wrappers? Let me know. I would love to know your thoughts and feedback about this topic.
Support and Feedback
If you have any comments or questions, please feel free to reach out to me on LinkedIn.
If you like my blog content and wish to keep me going, please consider donating on Buy Me a Coffee or Patreon. Help, in any form or amount, is highly appreciated and it's a big motivation to keep me writing more articles like this.
Consulting Services
I also provide a few consulting services on Topmate.io, and you can reach out to me there too. These services include,

