Adding a 3D Horizontal Shadow Effect in iOS apps using SwiftUI Gradient

SwiftUI gradient has many applications to add a delightful experience in your iOS applications. One such example is adding a horizontal shadow view which acts as a boundary between different sections on iOS.
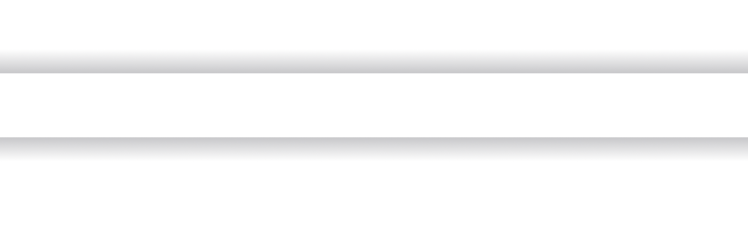
LinearGradient can be used to create the appearance of a horizontal shadow to achieve this purpose. The UI will look something like this so we know what we're getting at.

Creating a Simple Shadow
To create a shadow, we will use LinearGradient API in SwiftUI. Linear gradient allows us to specify start and end colors and directions. For example, I can specify what's the start and end color for the shadow view I am adding and in which direction that should be laid out.
To create a shadow view, I will start with a standard gray and white color each with an opacity of 0.5. Just for the example, I will start from the top and end the gradient at the bottom. We can also control the shadow height by limiting the gradient's frame height.
var body: some View {
    LinearGradient(colors: [
        Color.gray.opacity(0.5),
        Color.white.opacity(0.5)
    ], startPoint: .top, endPoint: .bottom).frame(height: 12)
}
However, this is not the only direction you may want to add shadow in. Let's try the shadow that goes from bottom to top by flipping start and end points.
var body: some View {
    LinearGradient(colors: [
        Color.gray.opacity(0.5),
        Color.white.opacity(0.5)
    ], startPoint: .bottom, endPoint: .top).frame(height: 12)
}
Generalizing shadow component
It's good that we were able to create upward and downward shadow components by switching start and end values for the LinearGradient. Moving one step forward, let's generalize this by enclosing this logic in a new component, namely ShadowComponent
The new ShadowComponent will contain,
- An enum of type
Direction. This will decide whether we want an upward or downward shadow - This enum will have the utility function which will return the tuple of type
(start: UnitPoint, end: UnitPoint). The value of this tuple will be calculated based on the direction. For example, if it's upward, we will start at the bottom and end at the top and so on - The body of the shadow component will contain similar code to create a gradient as we saw above but it will be configured based on the passed direction
struct ShadowComponent: View {

    enum Direction {
        case upward
        case downward

        func getStartEndPoints() -> (start: UnitPoint, end: UnitPoint) {
            switch self {
            case .upward:
                return (.bottom, .top)
            case .downward:
                return (.top, .bottom)
            }
        }
    }

    let direction: Direction

    var body: some View {

        let startEndPoints = direction.getStartEndPoints()
        LinearGradient(colors: [
            Color.gray.opacity(0.5),
            Color.white.opacity(0.5)
        ], startPoint: startEndPoints.start, endPoint: startEndPoints.end).frame(height: 12)
    }
}
Now let's see what it looks like in both configurations,
struct ShadowComponent_Previews: PreviewProvider {
    static var previews: some View {
        VStack(spacing: 32) {
            ShadowComponent(direction: .upward)
            ShadowComponent(direction: .downward)
        }
    }
} 
Adding a Container View for ShadowComponent
Creating a shadow component with shadow directions is great. But if we need to add shadows on the top and bottom of any number of arbitrary views, that's still a lot of work and repetition. To minimize the amount of code we have to write, let's wrap this shadow view into the container view.
The container view will take in any parameter as long as its type is some View. The caller to this API will also be able to specify where exactly they want to add shadow. In most cases, it will be at the top and/or bottom and they can control the shadow's placement.
The container view will have,
- Generic
contentwhich will represent the object of typesome View - An enum of type
ShadowPositionwhich will decide where the shadow will be put. The possible cases are -top,bottomandboth. Based on the passed value, the shadow will be put either on the top, at the bottom, or in both places
With these pieces in place, we're ready to write a ShadowContainerView
struct ShadowContainerView<Content: View>: View {

    let content: Content
    let shadowPosition: ShadowPosition

    enum ShadowPosition {
        case top
        case bottom
        case all
    }

    init(content: @escaping () -> Content,
         shadowPosition: ShadowPosition
    ) {
        self.content = content()
        self.shadowPosition = shadowPosition
    }

    var body: some View {
        VStack {
            if shadowPosition != .bottom  {
                ShadowComponent(direction: .upward)
            }
            content
            if shadowPosition != .top {
                ShadowComponent(direction: .downward)
            }
        }
    }
}
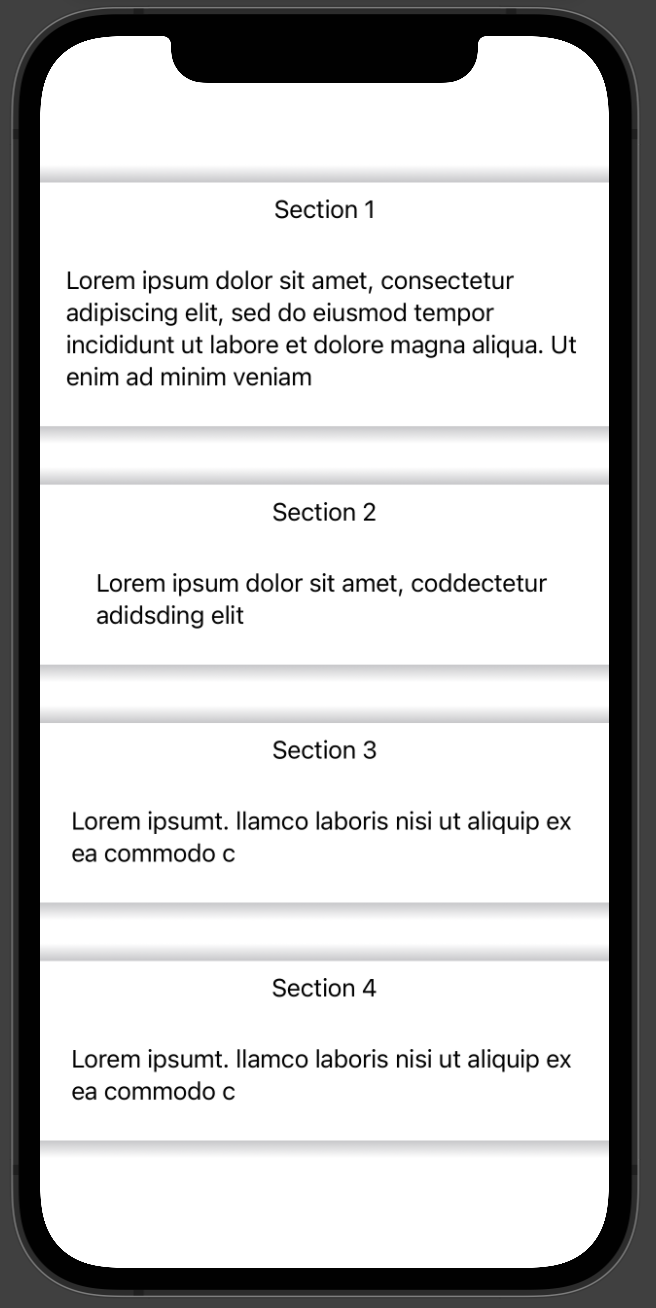
Let's see this in action with a SwiftUI preview,
struct ShadowComponent_Previews: PreviewProvider {
static var previews: some View {
VStack(spacing: 16) {
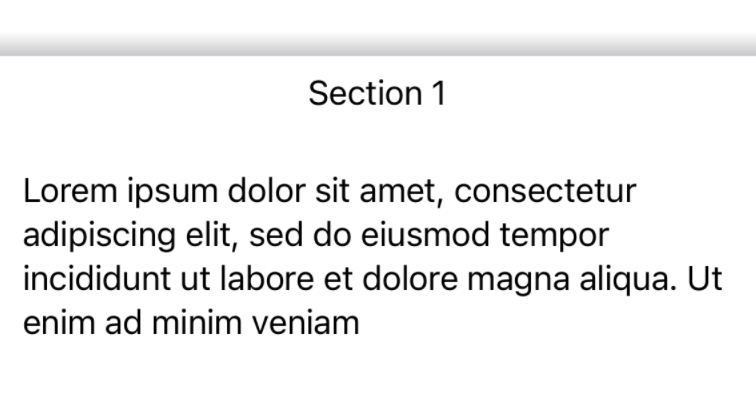
ShadowContainerView(content: {
VStack {
Text("Section 1")
Text("Lorem ipsum dolor sit amet, consectetur adipiscing elit, sed do eiusmod tempor incididunt ut labore et dolore magna aliqua. Ut enim ad minim veniam").padding()
}
}, shadowPosition: .top)
Rectangle().fill(Color.red).frame(width: 400, height: 1).padding()
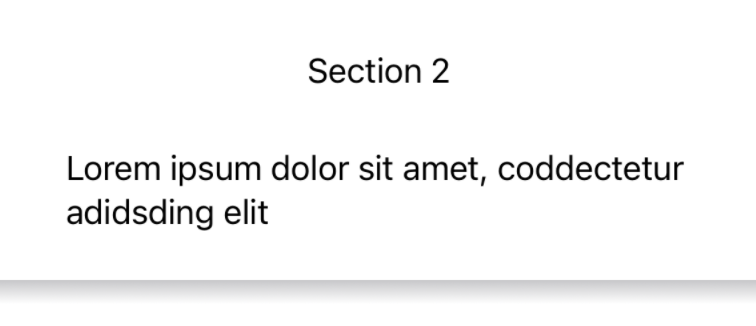
ShadowContainerView(content: {
VStack {
Text("Section 2")
Text("Lorem ipsum dolor sit amet, coddectetur adidsding elit").padding()
}
}, shadowPosition: .bottom)
Rectangle().fill(Color.red).frame(width: 400, height: 1)
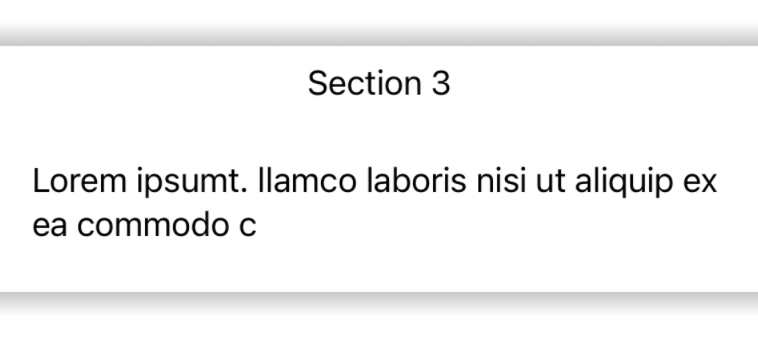
ShadowContainerView(content: {
VStack {
Text("Section 3")
Text("Lorem ipsumt. llamco laboris nisi ut aliquip ex ea commodo c").padding()
}
}, shadowPosition: .all)
}
}
}
Let's try to piece it all together again to make a screen that has multiple sections and each section is divided by shadow views.
Source Code
The full source code of this tutorial is available in the Github Gist format for reference.
Summary
That concludes our today's tutorial on how to create a shadow view in SwiftUI using LinearGradient. Hope you liked it and learned something from it. If you have any questions, comments, concerns, or follow-up questions about this post, feel free to reach out on Twitter @jayeshkawli.

