Swipe Actions Modifier in SwiftUI


Apple introduced new swipe actions modifiers in iOS 15.x. These new actions aim at reducing clutter and providing an intuitive user experience while making app developers' lives much easier enabling them to spend less time developing custom actions.
To understand how these action modifiers are improved in newer iOS versions, let's start with basic examples. We will incrementally keep on embellishing examples with newer additions from iOS 15.
What is Swipe Action?
Swipe action is a mechanism provided on iOS to allow users to perform custom actions by swiping cells in the list view to the left or right. They allow developers to pack multiple actions underneath the cells without causing unnecessary clutter. These actions remain hidden until the user swipes the list item to reveal them in the background.
How to add Swipe Action to the list item?
We can add swipe actions to each item in the list using swipeActions modifier. This modifier is applied directly to the list item and can be configured with buttons and actions to trigger.
struct Place: Identifiable {
    let id: String
    let name: String
    let imageName: String
    var isFavorited: Bool = false
}

struct SwipeActionsModifier: View {

    @State var places = [
        Place(id: "1", name: "Mumbai", imageName: "car"),
        Place(id: "2", name: "Vienna", imageName: "airplane"),
        Place(id: "3", name: "Amsterdam", imageName: "camera"),
        Place(id: "4", name: "Prague", imageName: "alarm"),
        Place(id: "5", name: "Delhi", imageName: "bag")
    ]

    var body: some View {
        List {
            ForEach(places) { place in
                HStack {
                    Image(systemName: place.imageName)
                    Text(place.name)
                }.swipeActions {
                    Button {

                    } label: {
                        Label("Favorite", systemImage: "heart")
                    }
                }
            }
        }
    }
}
In the above example, we are showing the list of places along with their names and images. We have added swipe action to each item on the list using swipeActions modifier.
By default, this modifier is added on the trailing edge. As the user swipes to the left, the swipe action will be shown to the user. We are using the favorite icon to show the default swipe action.
Attaching Actions to Swipe Modifier
So far we haven't attached any actions to the swipe modifier shown in the above example. In the next step, we will add support to toggle between favorited and unfavorited states for each place in the list.
As the user swipes to the left, the swipe action will show the button to favorite the item. Initially, the place will be in the unfavorited state and as the user executes the favorite tap action, the place will be marked as favorite, and so on.
import SwiftUI

struct Place: Identifiable {
    let id: String
    let name: String
    let imageName: String
    var isFavorited: Bool = false
}

struct SwipeActionsModifier: View {

    @State var places = [
        Place(id: "1", name: "Mumbai", imageName: "car"),
        Place(id: "2", name: "Vienna", imageName: "airplane"),
        Place(id: "3", name: "Amsterdam", imageName: "camera"),
        Place(id: "4", name: "Prague", imageName: "alarm"),
        Place(id: "5", name: "Delhi", imageName: "bag")
    ]

    var body: some View {
        List {
            ForEach($places) { $place in
                HStack {
                    let tintColor: Color = place.isFavorited ? .pink : .black
                    Image(systemName: place.imageName).foregroundColor(tintColor)
                    Text(place.name).foregroundColor(tintColor)
                }.swipeActions {
                    Button {
                        withAnimation {
                            place.isFavorited.toggle()
                        }
                    } label: {
                        if place.isFavorited {
                            Label("UnFavorite", systemImage: "heart.slash")
                        } else {
                            Label("Favorite", systemImage: "heart")
                        }
                    }
                }
            }
        }
    }
}
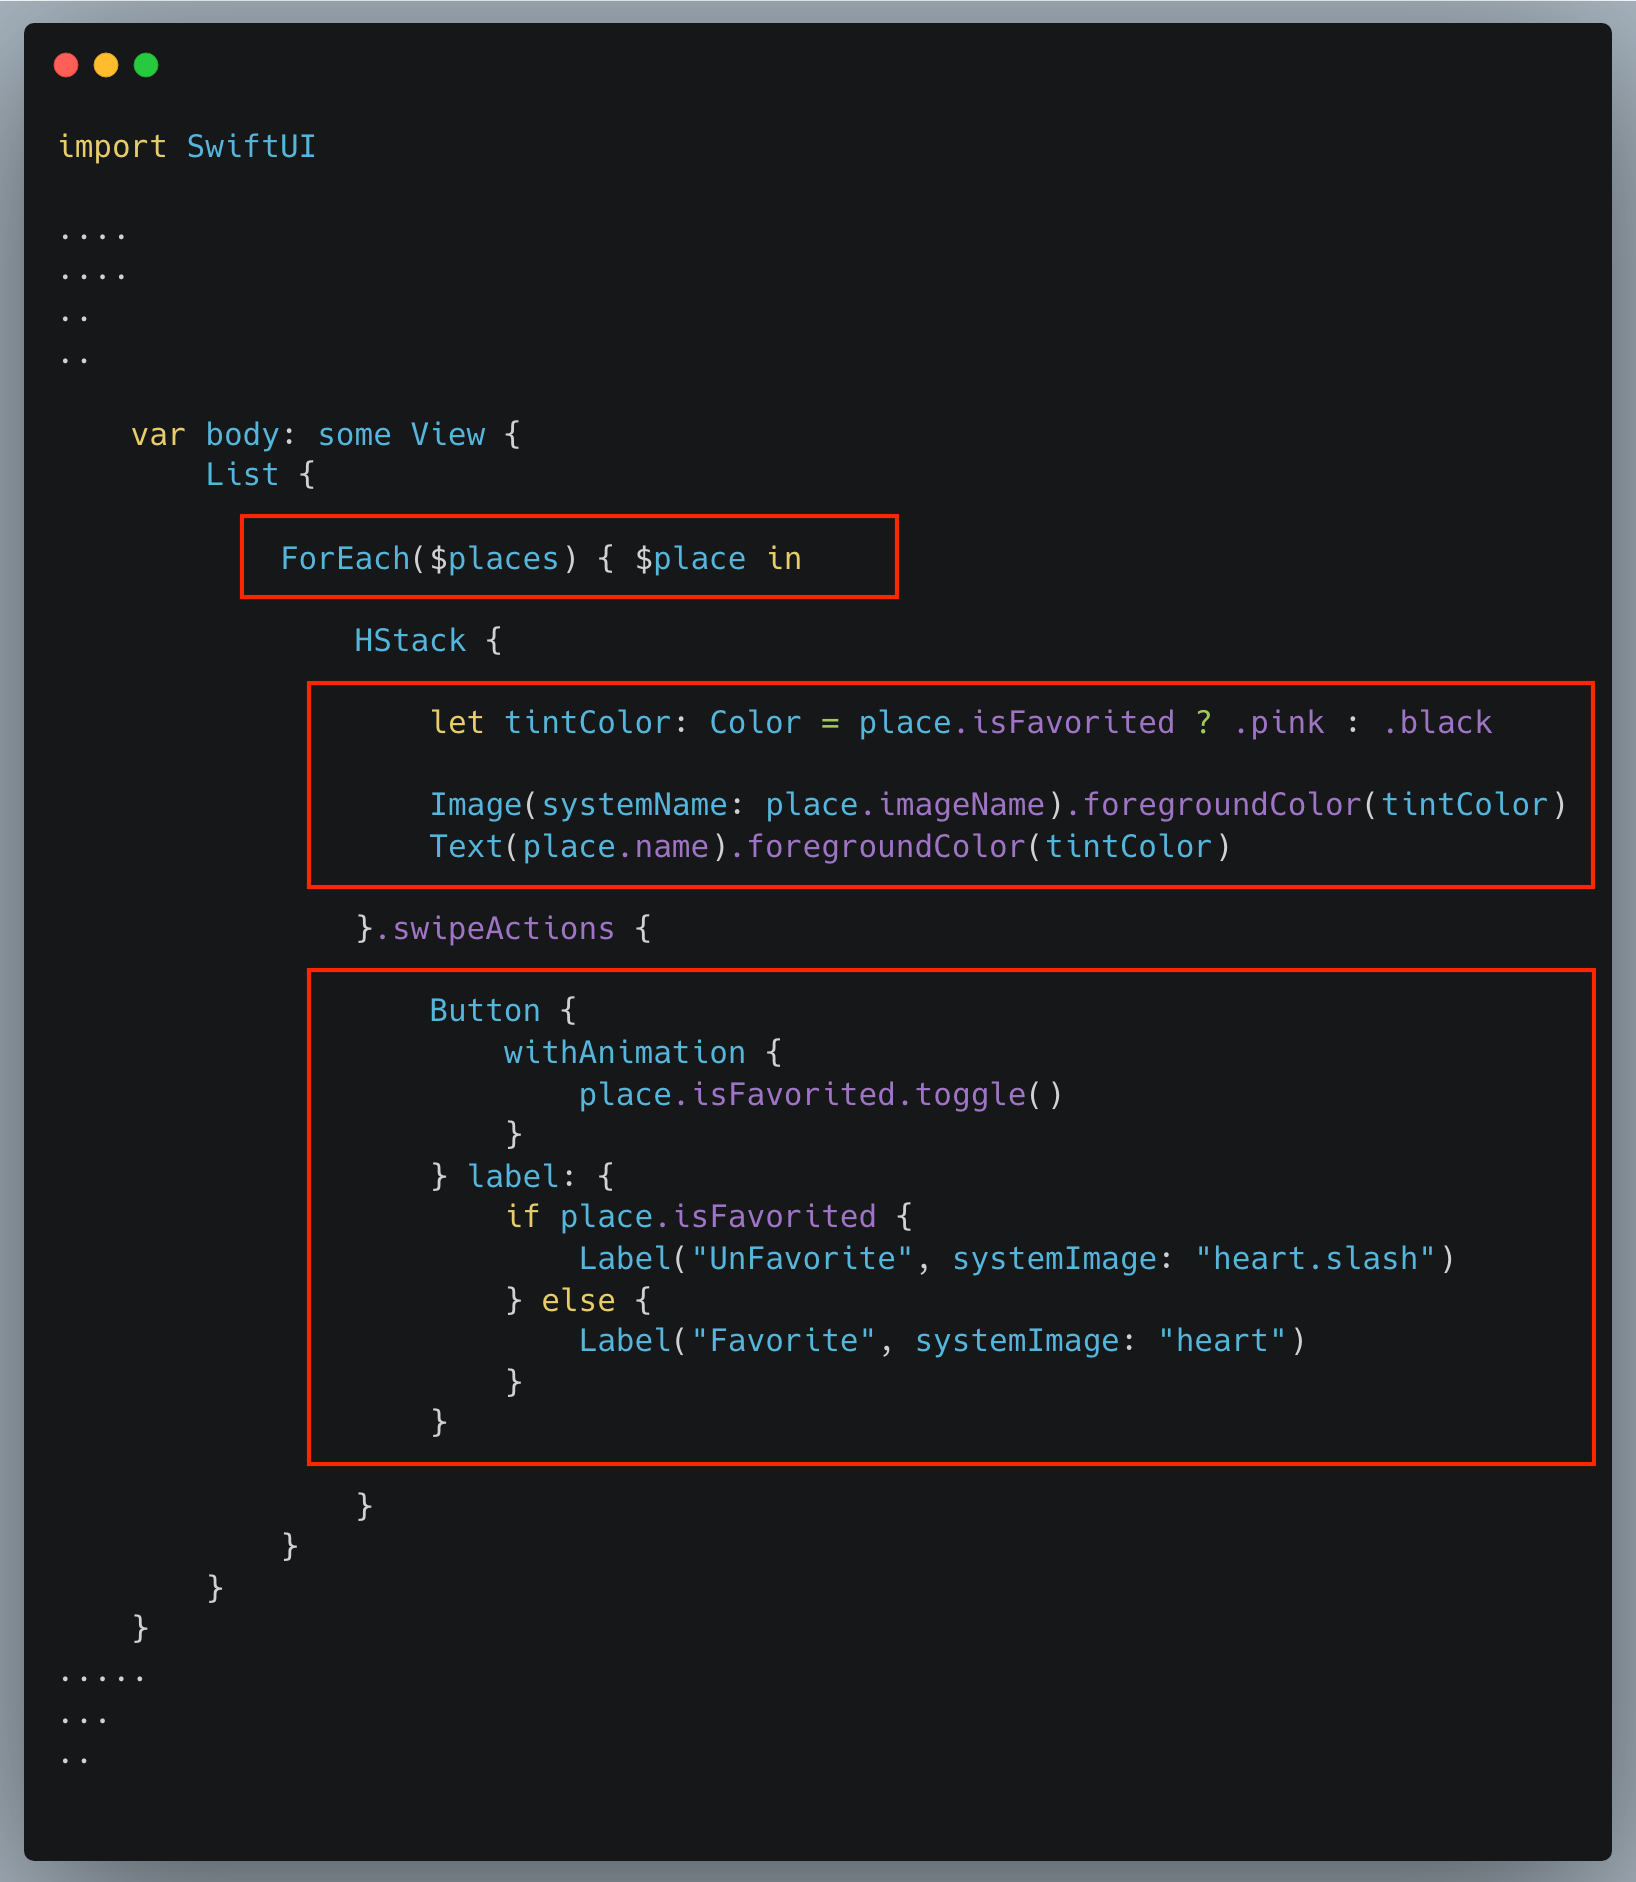
Few things to note in the above example,
- We are using a binding syntax in
ForEachloop since we are editing the property associated with the place variable. Without this syntax, we won't be able to modify place objects passed in the closure - We are setting the tint for the list row item which is dependent on the favorited status of the place
- Users can tap on the swipe action to favorite or unfavorite the selected place
Adding Custom Tint Color to Swipe Action Button
We can add a custom tint color to swipe action buttons using tintColor property on each swipe action view. In the above example, we will apply it directly to the Button view.
Button {
    withAnimation {
        place.isFavorited.toggle()
    }
} label: {
    if place.isFavorited {
        Label("UnFavorite", systemImage: "heart.slash")
    } else {
        Label("Favorite", systemImage: "heart")
    }
}.tint(.green)
Changing the Position of Swipe Action
By default, swipe actions are added on the trailing edge of the list. You can, however, customize its positioning by passing desired edge parameter when swipe actions are initialized
Leading Edge
HStack {
    .....
    ...
    ..
}.swipeActions(edge: .leading) {
    Button {

    } label: {
        Label("Favorite", systemImage: "heart")
    }
}
Trailing Edge
HStack {
    .....
    ...
    ..
}.swipeActions(edge: .trailing) {
    Button {

    } label: {
        Label("Favorite", systemImage: "heart")
    }
}
Adding Multiple Swipe Actions
Adding swipe actions isn't limited to just one action. You can add any number of swipe actions either on the leading or the trailing edge. It all depends on the desired user experience, available space, and end-user requirements.
Multiple swipe actions can be added by applying multiple swipeActions in succession to list items configuring them on either leading or trailing edges.
HStack {

    ......
    ....
    ..

}.swipeActions(edge: .leading) {
    Button {

    } label: {
        Label("Favorite", systemImage: "heart")
    }
}.swipeActions(edge: .leading) {
    Button {

    } label: {
        Label("Pin", systemImage: "pin")
    }
}.swipeActions(edge: .trailing) {
    Button {

    } label: {
        Label("Cut", systemImage: "scissors")
    }
}.swipeActions(edge: .trailing) {
    Button {

    } label: {
        Label("Focus", systemImage: "scope")
    }
}

Summary
So this was all about how to add swipe actions in the app and how to customize them with advanced options from iOS 15. Swipe actions are a powerful and intuitive tool to provide a rich functionality to users without cluttering the UI. However, we also need to use them in moderation. Adding too many swipe actions can easily distract and confuse users and take them away from the real purpose of the app. As long as you are designing them with user requirements and the end goal of the app, they serve their purpose.
Source Code
The full source code from this article is available on Github for free for future reference. Please feel free to suggest suitable modifications and improvements to the original version
If you have any feedback or comments about this article, please feel free to contact me on Twitter at @jayeshkawli. You can also reach out to me if you have any suggestions for such articles in the future.

