How to use WebSockets on iOS using Swift


From Wikipedia,
WebSocket is a computer communications protocol, providing full-duplex communication channels over a single TCP connection. Although very useful on Web using JavaScript, we don't use it a lot on iOS platform.
From MDN,
The WebSocket API is an advanced technology that makes it possible to open a two-way interactive communication session between the user's browser and a server. With this API, you can send messages to a server and receive event-driven responses without having to poll the server for a reply.
However, there are definitely cases where WebSockets is useful on the iOS client side. Applications include updates for stocks prices, product price and quantity updates, and even game score updates at a regular interval.
Recently, I was interested in learning more about them since I was given a problem statement that explicitly involves working with sockets to get real-time data from APIs - In this case stock ticker data.
Problem Statement:
Let me begin with a brief problem statement. Users are presented with a list of trading options they can choose from. Once they make a selection, they go to the next screen where they can see real-time prices of selection. Options could be Gold price, currency exchange rate, individual stocks, or stock indices such as Sensex, Germany 30, etc.
Foundation for the Solution:
Unlike regular HTTP requests which fire and forget, our WebSocket opens the connection, subscribes to data, receives the data through events until the connection is either closed or unsubscribe event is registered.
Here is the step by step flow for connection,
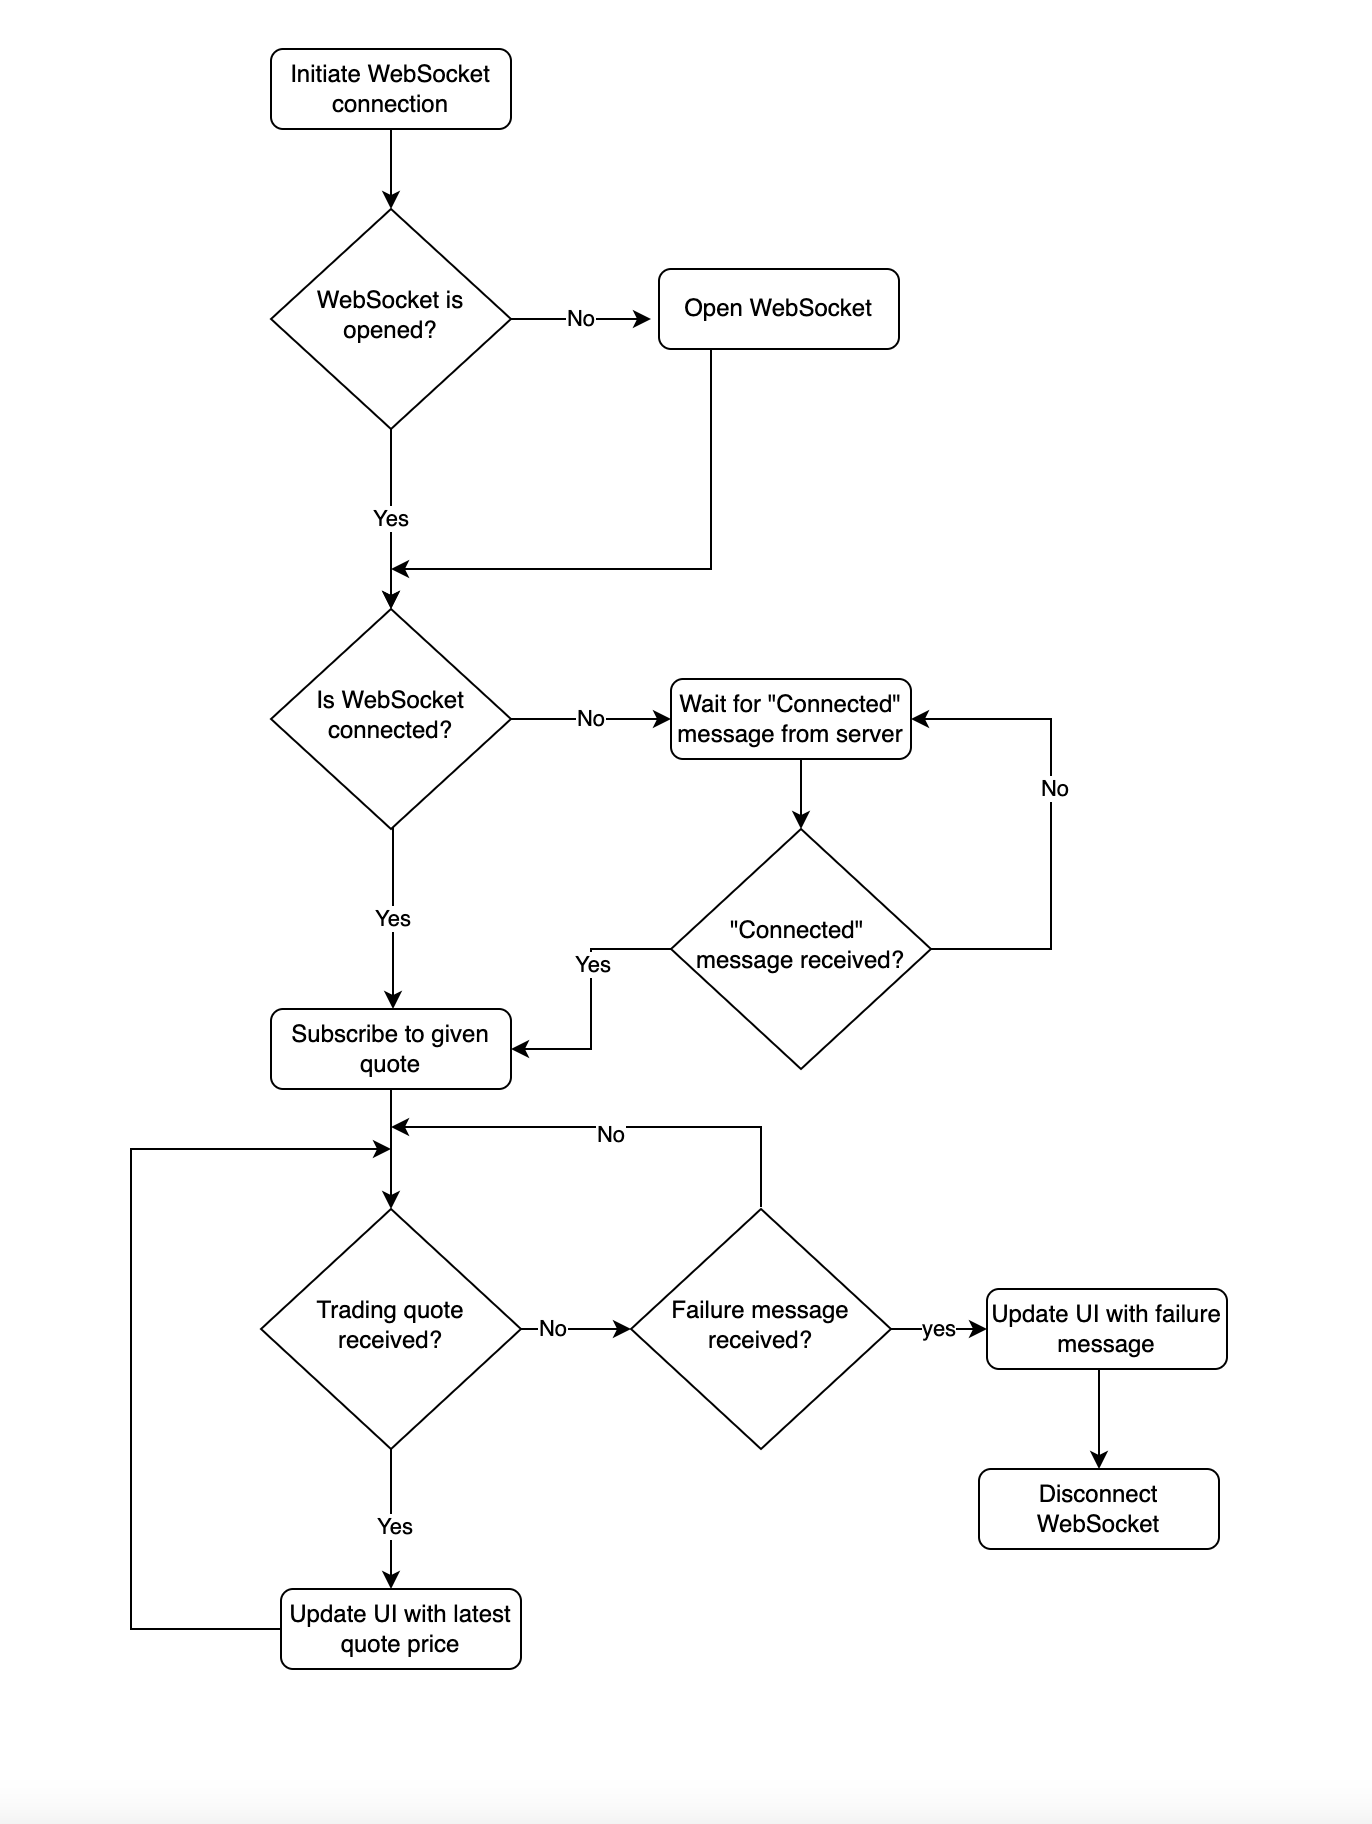
This connection stream continues until the connection is cut-off or WebSocket is closed.
Implementation
With a foundation in place, let's begin work on implementation. Although iOS provides WebSocket support through URLSessionWebSocketTask, I decided to use a third-party library since it had better documentation and was easy to use compared to what Apple offered.
The third-party library I am using is, SwiftWebSocket. It's easy to use, provides clean examples, and is simple to test. With a flowchart in place, let's see how we can use it to trigger WebSocket connection and receive quote prices in real-time.
WebSocket URL
For this exercise, I am using the web socket URL provided by the BUX platform. this tutorial follows all the conventions provided by it. Since different URLs have different standards while establishing connections and sending messages, you might want to change this implementation based on the convention followed by your WebSocket URL.
wss://rtf.beta.getbux.com/subscriptions/me*
*Also need to request authorization information for this endpoint
Installation
To install SwiftWebSocket in your project, please add the following entry to your podfile and run pod install or pod update
target '<project_name>' do
  use_frameworks!
  pod 'SwiftWebSocket'

  target '<project_name>Tests' do
    inherit! :search_paths
  end
end
Importing module
To import module to your file, add the following line on top and you're ready to start,
import SwiftWebSocketOpening Connection
Now with our basics cleared, let's write a code to open the WebSocket,
import SwiftWebSocket

var webSocket: WebSocket?
var opened = false
var connected = false

private func openWebSocket(urlString: String) {
    if let url = URL(string: urlString) {
        var request = URLRequest(url: url)

        // Add custom header parameters if necessary
        request.addCustomHeaders()

        let webSocket = WebSocket(request: request)

        webSocket.event.open = { [weak self] in
            self?.opened = true
        }

        webSocket.event.close = { [weak self] (code, reason, clean) in
            guard let self = self else { return }
            self.webSocket = nil
            self.connected = false
            self.opened = false
        }
        self.webSocket = webSocket
    } else {
        webSocket = nil
    }
}
Let's see what we are doing in the above code,
- Function
openWebSockettakesurlStringas an input. This string represents the web socket endpoint we're getting data from - We add the necessary header parameters to our request. Header parameters may include authorization information and keys etc.
- We initialize a new
WebSocketinstance with thisURLRequestobject and assign it to the property to maintain its lifetime throughout the application - We also add a couple of calls backs to
webSocketinstance. First to notify the client that the socket has been successfully opened and settingopenedflag totrue - Second, we also add a callback when the socket is closed. When closed, we nil out
webSocketinstance and setconnectedandopenedproperties to false
Connecting and Receiving Messages from endpoint
Once we successfully open the connection, the next step is to set up a callback to receive messages. Messages may include initial ping to connect and subsequent messages which may be trading quotes or values that change periodically over time after initial subscription is done.
Let's look at the code first and then we will go over it one by one,
....
...
openWebSocket()
....
..

webSocket.event.message = { [weak self] message in
    guard let self = self else { return }

    if let message = message as? String, let messageType = self.getMessageType(from: message) {
        switch(messageType) {
        case .connected:
            self.connected = true
            self.subscribeToServer(with: productID)
        case .tradingQuote:
            let currentQuote = self.getCurrentQuoteResponse(from: message)
            print("Current value of selected stock \(currentQuote.price)")
        }
    }
}
- First off, we open the
webSocketand assign its value to the propertywebSocketto be used later - With the web socket open, we are ready to receive messages from the server. To catch them, we add another callback to capture them
- Messages are just a combination of message type and metadata. We parse the message string and decide whether it indicates the successful connection or a real-time data
- If the message type is
connected, then we successfully established the web socket connection and send another request to register to a specific product withproductIDso that we can periodically get its real-time values - Once we subscribe to specific
productID, we get another message in event message callback with typetradingQuotewhich indicates this payload contains the current value of the selected product. For example, selected stock or currency exchange - We pass the message string to the utility method
getCurrentQuoteResponsewhich parses that string and return theQuoteobject for further processing
Here is the code to subscribe to the server after a connection is successfully established,
private func subscribeToServer(with productID: String) {
    let subscriptionPayload = self.subscriptionPayload(for: productID)
    webSocket.send(subscriptionPayload)
}
We create a subscription payload with given productID and send it over to the opened webSocket. Once the server receives this payload, it will send the periodic data through the opened event.message channel. This data will be in the form of a string with type tradingQuote for this particular use-case.
Now with this in place, we will continue getting subscribed quote values as long as the connection is open.
Unsubscribing and Closing the web socket connection
If you no longer need to receive values over the web socket, it's time to unsubscribe (optional) and close the web socket connection. Opening a web socket is an expensive operation so you can keep it open as long as you want while subscribing to additional quotes, but if you know the user is navigating away from the section of the app that needs real-time values, you can safely close it off.
func unsubscribeFromQuote(for productID: String) {
    let payload = ["unsubscribeFrom": ["trading.product.\(productID)"]]
    if let jsonData = try? JSONSerialization.data(withJSONObject: payload, options: []) {
        if let jsonPayload = String(data: jsonData, encoding: .utf8) {
            webSocket?.send(jsonPayload)
        }
    }
}
To unsubscribe, we use the productID to construct unsubscription payload, convert it into a string, and send it over using opened webSocket connection.
Once unsubscription completes, we will close the webSocket and clean up the remaining part
webSocket?.close()
self.webSocket = nil
self.connected = false
self.opened = false
Summary
WebSocket may not have a day-to-day application, but it's a powerful tool to efficiently receive real-time periodic updates. Fortunately, iOS has built-in WebSocket support in form of URLSessionWebSocketTask which can be utilized without needing third-party support.
This article was my attempt to give you a glimpse at the basic working of WebSockets on Swift and iOS and how to use them. The examples given in this article may not apply to you, but basics remain the same. WebSocket has the following three core functionalities,
- Opening a connection
- Receiving and Sending messages over the connection
- Closing the connection
If you want to play more with how sockets work, you can directly use the BUX provided URL to fetch real-time stock values. Please note, it works best during European trading time and needs authorization information which you can request from platform API.
This is all I have for today. Next time I will expand this topic on two fronts,
Thanks for reading and if you have additional comments, feedback or concerns, please feel free to reach out on Twitter @jayeshkawli

