Interactive Notifications iOS

Note : This post uses Houston to send push notifications. Please refer to official Github page or my Previous post on how to send automated test push notifications
- Push notifications with Accept/Cancel buttons
In order to achieve this, let's create a method called registerForNotification in didFinishLaunchingWithOptions method from Appdelegate
- (BOOL)application:(UIApplication*)application didFinishLaunchingWithOptions:(NSDictionary*)launchOptions {
    [self registerForNotification];
    return YES;
}
Let's also declare some identifiers to associate with push notification actions.
NSString* const NotificationCategoryIdent = @"ACTIONABLE";
NSString* const NotificationActionOneIdent = @"ACTION_CANCEL";
NSString* const NotificationActionTwoIdent = @"ACTION_OK";
Now, I am assuming you are using iOS8 for app development. If you are on the version lower than it, I suggest you to add additional code that is compatible with iOS < 8.0
Here is how register for interactive notifications,
- (void)registerForNotification {

    UIMutableUserNotificationAction* action1;
    action1 = [[UIMutableUserNotificationAction alloc] init];
    [action1 setActivationMode:UIUserNotificationActivationModeBackground];
    [action1 setTitle:@"Cancel"];
    [action1 setIdentifier:NotificationActionOneIdent];
    [action1 setDestructive:YES];
    [action1 setAuthenticationRequired:NO];

    UIMutableUserNotificationAction* action2;
    action2 = [[UIMutableUserNotificationAction alloc] init];
    [action2 setActivationMode:UIUserNotificationActivationModeForeground];
    [action2 setTitle:@"OK"];
    [action2 setBehavior:UIUserNotificationActionBehaviorDefault];
    [action2 setIdentifier:NotificationActionTwoIdent];
    [action2 setDestructive:NO];
    [action2 setAuthenticationRequired:NO];

    UIMutableUserNotificationCategory* actionCategory;
    actionCategory = [[UIMutableUserNotificationCategory alloc] init];
    [actionCategory setIdentifier:NotificationCategoryIdent];
    [actionCategory setActions:@[ action1, action2 ] forContext:UIUserNotificationActionContextDefault];


   NSSet* categories = [NSSet setWithObjects:actionCategory, nil];
    UIUserNotificationType types =
        (UIUserNotificationTypeAlert | UIUserNotificationTypeSound | UIUserNotificationTypeBadge);

    UIUserNotificationSettings* settings = [UIUserNotificationSettings settingsForTypes:types categories:categories];

    [[UIApplication sharedApplication] registerUserNotificationSettings:settings];
    [[UIApplication sharedApplication] registerForRemoteNotifications];
}
Now you can override the following method and handle user action as follows,
- (void)application:(UIApplication*)application
    handleActionWithIdentifier:(nullable NSString*)identifier
         forRemoteNotification:(NSDictionary*)userInfo
              withResponseInfo:(NSDictionary*)responseInfo
             completionHandler:(void (^) ())completionHandler {
    if ([identifier isEqualToString:NotificationActionTwoIdent]) {
        // Do something associated with OK button action
    } else {
       // Do something associated with Cancel button action
    }
    if (completionHandler) {
        completionHandler ();
    }
}
The reason we are checking identifier is to differentiate between
OKandCancelactions. If you have more than 2 buttons, you can add equal number of identifiers to distinguish between them
Now, you can add interactive push notification using command line tool Houston as follows, (If you are not familiar with Houston, you can go through my previous blog post)
apn push "[device_push_token]" -c path_to_certificate_pem_file -m "[push_notification_message_title]" -b [badge_number_to_attach_to_app] -d [payload_data_in_the_key_value_form_separated_by_comma] y "[UIMutableUserNotificationCategory_object_category_identifier]"
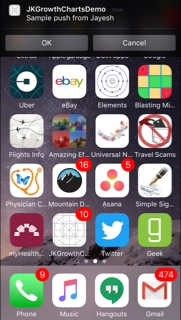
If your app is running in the background, as soon as push arrived, you can slide down the notification and see two options as follows,
Interactive Push notification action with OK and Cancel buttons
- Adding text input to interactive notifications when user accepts an action. (Equivalent to pressing OK button from interactive notification)
There are couple of things you will have to change when you register for push notification.
-
Change
activationModeassociated withUIMutableUserNotificationActiontoUIUserNotificationActivationModeBackground -
Change
behaviorassociated withUIMutableUserNotificationActiontoUIUserNotificationActionBehaviorTextInput
So you registerForNotification method will look like this,
- (void)registerForNotification {

    UIMutableUserNotificationAction* action1;
    action1 = [[UIMutableUserNotificationAction alloc] init];
    [action1 setActivationMode:UIUserNotificationActivationModeBackground];
    [action1 setTitle:@"Cancel"];
    [action1 setIdentifier:NotificationActionOneIdent];
    [action1 setDestructive:YES];
    [action1 setAuthenticationRequired:NO];

    UIMutableUserNotificationAction* action2;
    action2 = [[UIMutableUserNotificationAction alloc] init];
    [action2 setActivationMode:UIUserNotificationActivationModeBackground];
    [action2 setTitle:@"OK"];
    [action2 setBehavior:UIUserNotificationActionBehaviorTextInput];
    [action2 setIdentifier:NotificationActionTwoIdent];
    [action2 setDestructive:NO];
    [action2 setAuthenticationRequired:NO];

    UIMutableUserNotificationCategory* actionCategory;
    actionCategory = [[UIMutableUserNotificationCategory alloc] init];
    [actionCategory setIdentifier:NotificationCategoryIdent];
    [actionCategory setActions:@[ action1, action2 ] forContext:UIUserNotificationActionContextDefault];


   NSSet* categories = [NSSet setWithObjects:actionCategory, nil];
    UIUserNotificationType types =
        (UIUserNotificationTypeAlert | UIUserNotificationTypeSound | UIUserNotificationTypeBadge);

    UIUserNotificationSettings* settings = [UIUserNotificationSettings settingsForTypes:types categories:categories];

    [[UIApplication sharedApplication] registerUserNotificationSettings:settings];
    [[UIApplication sharedApplication] registerForRemoteNotifications];
}
In the similar way you did earlier, the action chosen by user and text input by the user can be retrieved in the following method.
- (void)application:(UIApplication*)application
    handleActionWithIdentifier:(nullable NSString*)identifier
         forRemoteNotification:(NSDictionary*)userInfo
              withResponseInfo:(NSDictionary*)responseInfo
             completionHandler:(void (^) ())completionHandler {
    if ([identifier isEqualToString:NotificationActionTwoIdent]) {
        NSString* comment = responseInfo[UIUserNotificationActionResponseTypedTextKey];
        // Comment is the text entered by the user in the interactive notification's text input dialogue box. You might want to use that do background processing if required.

        if (comment.length > 0) {
            UIAlertView* alert = [[UIAlertView alloc] initWithTitle:@"User Entered Input"
                                                            message:comment
                                                           delegate:nil
                                                  cancelButtonTitle:@"Cancel"
                                                  otherButtonTitles:@"OK", nil];
            [alert show];
        }
    }

    if (completionHandler) {
        completionHandler ();
    }
}
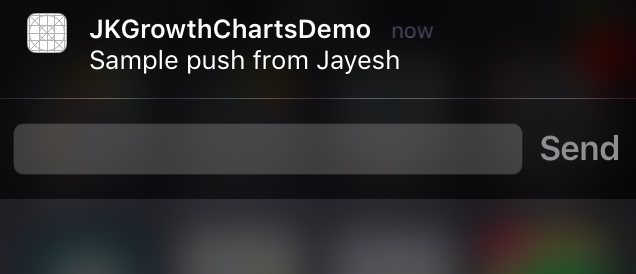
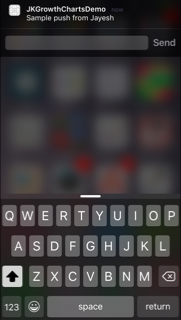
Here is how it looks on the phone with interactive notification mode changed to text input.
(You can use the previous command line instruction to send the interactive notification which will show text input to user)
Hope this helps to anyone who wants to play with interactive notifications allowing users to have multiple options to choose from or allowing them to input information without opening an app directly. If you have any question or find any inaccuracy, please feel free to reach out to me. Any input is much appreciated.

