iOS Animations - Part 1

This is the first part of series of blog posts on iOS animations. Hope you will enjoy this series. I am also looking forward to hear your thoughts, input and suggestions on the content.
Image animation using image sprite
It was a while after I started iOS development I came to know about an iOS feature where you can use sprite images to make animation with fast moving images.
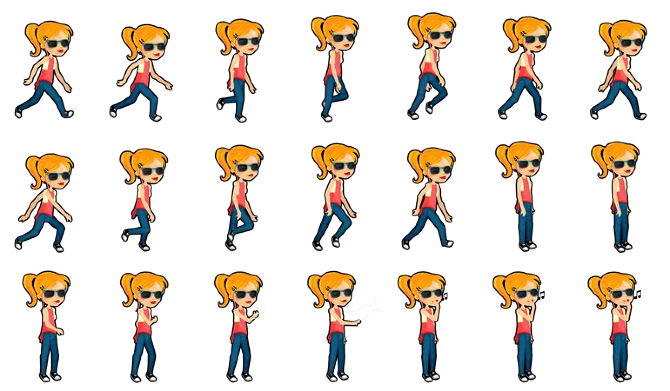
For example of sprites, you can look At this image.
The way animation takes place is we successively extract the specific portion of sprite and momentarily show it on the screen. And just as animation works, we will switch this image with next frame within 1/10 of second which will give an illusion of uninterrupted sequence since we are moving images so fast that it will not be recognizable to an eye.
You may use any kind of sprite sheet. But make sure to
- Use similar kind of images throughout the sheet to give smooth flow of animation
- Make sure the entire portion of sheet is filled with sprite images. Otherwise, animation will blank for some time while transition is in progress. Since at some point of time, there will be no images to add to an animation sequence.
For example let's say animatingView is a subclass of UIView which represents an area where you intend to display an animation. You can 'cut' the specific portion of sprite and display it on the animatingView as follows
UIView *animatingView = [[UIView alloc] initWithFrame:CGRectMake(0, 0, 100, 100)];
UIImage* animatingImage = [UIImage imageNamed:@"spriteKitImage.png"];

// Set the layer content to the sprite image
animatingView.layer.contents = (__bridge id) animatingImage.CGImage;
// set the contentsGravity for animatingView to the kCAGravityResizeAspect to retain the image aspect perspective.
animatingView.layer.contentsGravity = kCAGravityResizeAspect;
// Now set which part of image sprite you want to cut. Depending on the rect you pass, it will crop that specific region on spritImage and then overlay that on the animatingView layer.
animatingView.layer.contentsRect = CGRectMake(0.25, 0.5, 0.25, 0.25);
Please note in the above examples that we are using
contentsGravityproperty to set aspectFit mode as opposed to 'contentMode' since we are dealing with underlyingCALayerwhich backsUIView
I will explain last part in more depth as follows,
Say you have a sprite kit image which has 4 images row and column wise, you have total 16 images. Which makes your offset to be 1/4 = 0.25 in either direction. Which means when you successively iterate over sprite, you have to increment offset in either direction by the factor of 0.25 to get the next image. Also, since there are 4 images in either direction, each sub sprite image gets dimension of 1/4 = 0.25 too.
Now if you want to retrieve the images, based on their position you can get them and set to an animatingView as follows,
-
Top left corner -
animatingView.layer.contentsRect = CGRectMake(0, 0, 0.25, 0.25); -
Top right corner -
animatingView.layer.contentsRect = CGRectMake(0.75, 0, 0.25, 0.25); -
Bottom left corner -
animatingView.layer.contentsRect = CGRectMake(0, 0.75, 0.25, 0.25); -
Bottom right corner -
animatingView.layer.contentsRect = CGRectMake(0.75, 0.75, 0.25, 0.25);
You can use similar logic to extract other parts too. the way it works is most sprites I observed go row wise from left to right and then from top to bottom when row is completed. You can work up image dimensions beforehand. But to later x and y offset successively you can use NSTimer to update them in certain time interval.
For e.g.
[NSTimer scheduledTimerWithTimeInterval:0.1 target:self selector:@selector(changeAnimatingImageOffsets) userInfo:nil repeats:YES];
Where changeAnimatingImageOffsets is a method where you can manually increment x and y offsets to crop successive sprite portions.
Here's the original sprite image of girl running,
And finally here is the final code that crops specified portion from the sprite image and replaces them on the given ImageView
-(void)changeAnimatingImage {

    // Since image is Rectangular (If it's only 1-D you only have to change X position variable) we will update both X and Y coordinate successively


    if(self.xAxisSpriteOffset >= 1.0) {
        self.xAxisSpriteOffset = 0.0;
        // Traverse vertically
        self.yAxisSpriteOffset += _yOffsetIncrement;
    }

    // Once we reach the vertical limit, reset back to top
    if(self.yAxisSpriteOffset >= 1.0) {
        self.yAxisSpriteOffset = 0.0;
    }

    // Update image from the rectangle specified from the original image
    [self addSpriteImage:self.animatingImage toLayer:self.animatingView.layer withContentRect:CGRectMake(self.xAxisSpriteOffset, self.yAxisSpriteOffset, _xOffsetIncrement, _yOffsetIncrement)];

    // Traverse horizontally
    self.xAxisSpriteOffset += _xOffsetIncrement;
}
This is how the final product looks like in the demo project,
![]()
Ref: Original sprite kit Image taken from This source
You can find full source code along with demo and other animation examples on GitHub Repository

