Rewriting a Minesweeper - Part 2

Happy new year to all. I guess as I am getting old, I am not feeling enthusiastic enough about new years. There is one thing I am excited about though. Writing a rewriting Minesweeper game in Swift.
Yesterday was quite a productive day in terms of my progress. Here's the list of things I did yesterday.
- Got rid of as much as external dependencies as possible - I started a new Swift project from scratch so it didn't have any dependencies to start with. As much as possible I would like to keep it that way
- Divided the project into their own logic sections - After dividing project into sub-sections, this is how the project structure looks like now.
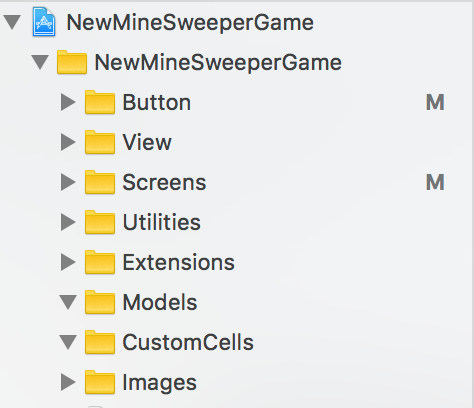
Well, there aren't many screen in this game, so I kept one screen (And possibly more in the future) under Screens folder. The similar logic goes for grouping other logical parts of the app as well
3. Converted old Objective-C code into Swift piecemeal - This was quite a challenging since it's been over 3 years since I finished the code. However, by going step-by-step I achieved the goal of porting all the required code to make the game running
Header view:
This view represents the top header on the game home screen. It is stored as a separate UIView subclass for easier testing and isolation. It also has its own ViewModel to pass necessary parameters
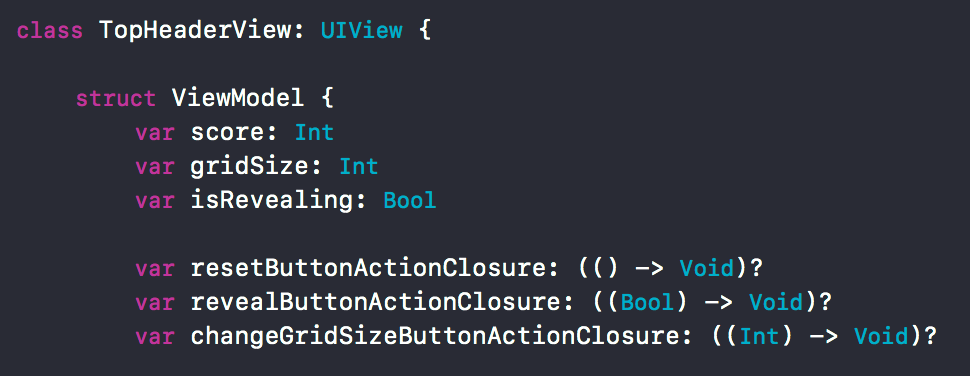
As you can see from the screenshot ViewModel is contained inside view and it has all the logical flags necessary for setting up view.

In addition to it, it also has few closures to convey the button actions user has executed such as reveal mines, reset, and changing grid size
View Model for Minesweeper home page
I also had to create a separate view model for main minesweeper screen to store all the required constants, configurations, and utility method to get values of computed properties.
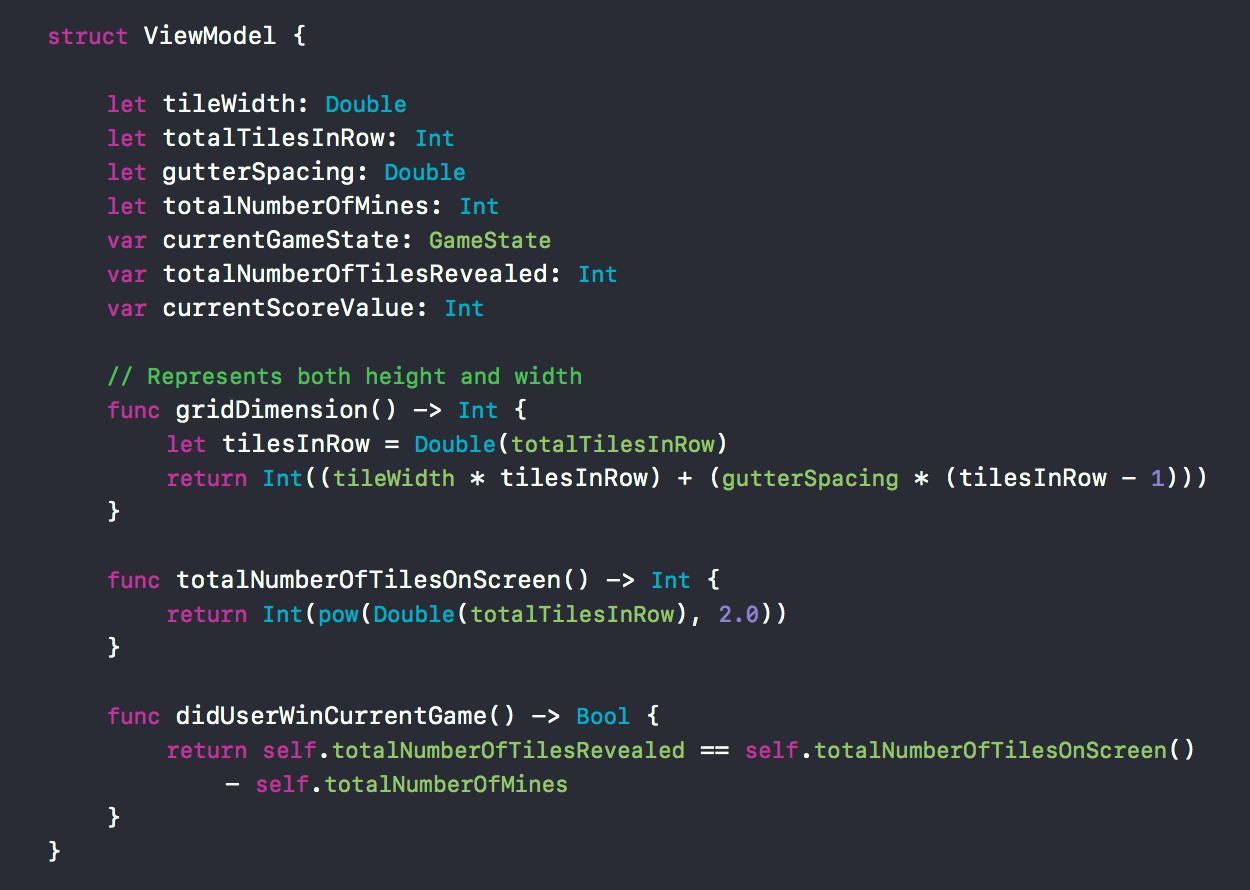
As you can see it just shows properties from ViewModel. Our view controller is supposed to use it as a brain to compute view and setting up things around
Generating mines and assigning numbers of adjacent cell
This was the second most difficult task to generate mines and assign number to calls around it (Depending on how many mines it is surrounded with). Let's look at the code,
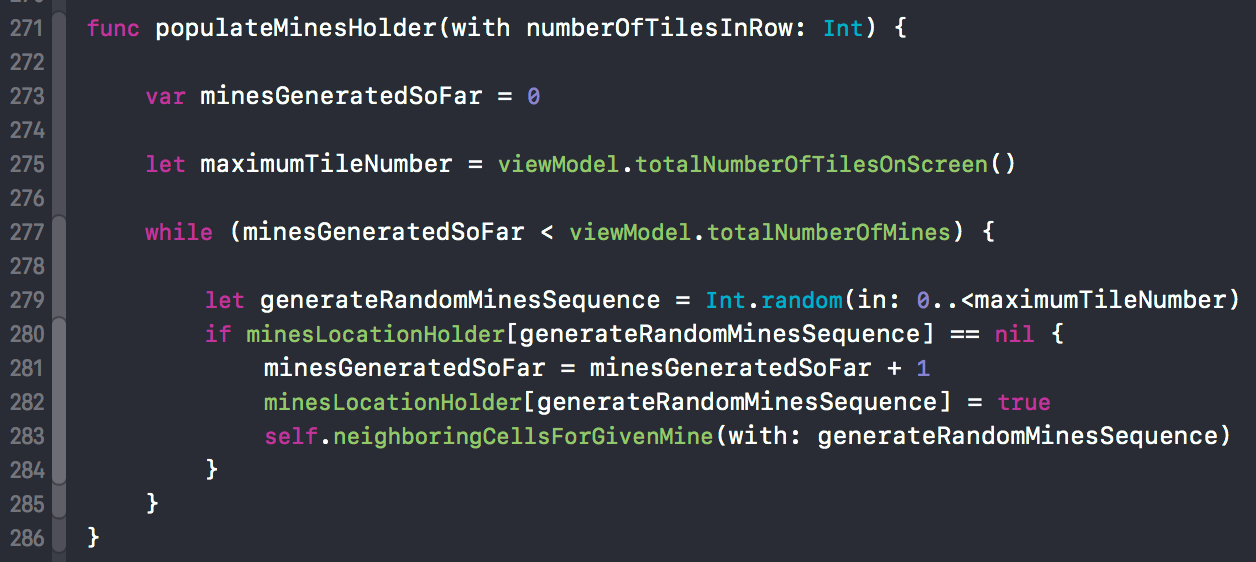
- This method is used to generate random mines location on the screen
Line 275gets the total number of tiles on the screen. Since we assume grid is always going to be square, we get this number simply by squaring parametertotalNumberOfTilesInRowfromViewModel- Now we run the
whilelook onLine 277until desired number of mines have been generated (This number too comes from theViewModel) - Here we use the dictionary names
minesLocationHolderto store all the previously generated mines. If we generate a random tile number to place mine on and that number had already been generated before, we will ignore this and run the while loop again - We are also keeping a track of number of mines generated so far so as to keep comparing it with desired number of originally wanted
- On the last line we are calling another method
neighboringCellsForGivenMineto populate the tiles neighboring mine with desired numbers
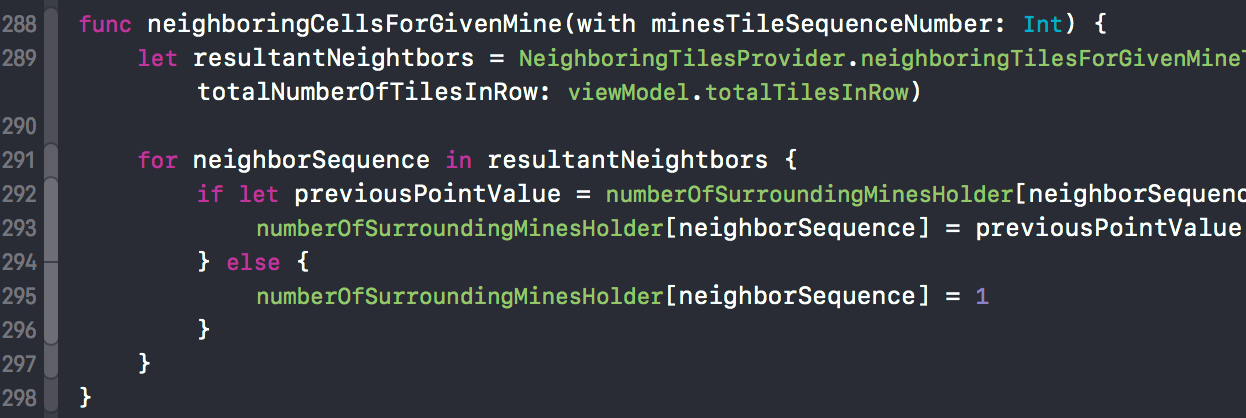
- On
Line 289we are getting the array of integers which indicate the immediate neighbors of given mine. It computes neighbors in all 8 directions - Second, we are maintaining the array names
numberOfSurroundingMinesHolderwhich is the dictionary of type[Int: Int]. It stores the tile sequence as a key and number of neighboring mines as a value - We iterate over neighboring tiles of each mine. It that tile does not exist in the
numberOfSurroundingMinesHolderdictionary, that means we encountered it for the first time. If it already contains, we encounter it for other mine, we increment the count by 1 to indicate that it has been surrounded by 2 mines and so on.
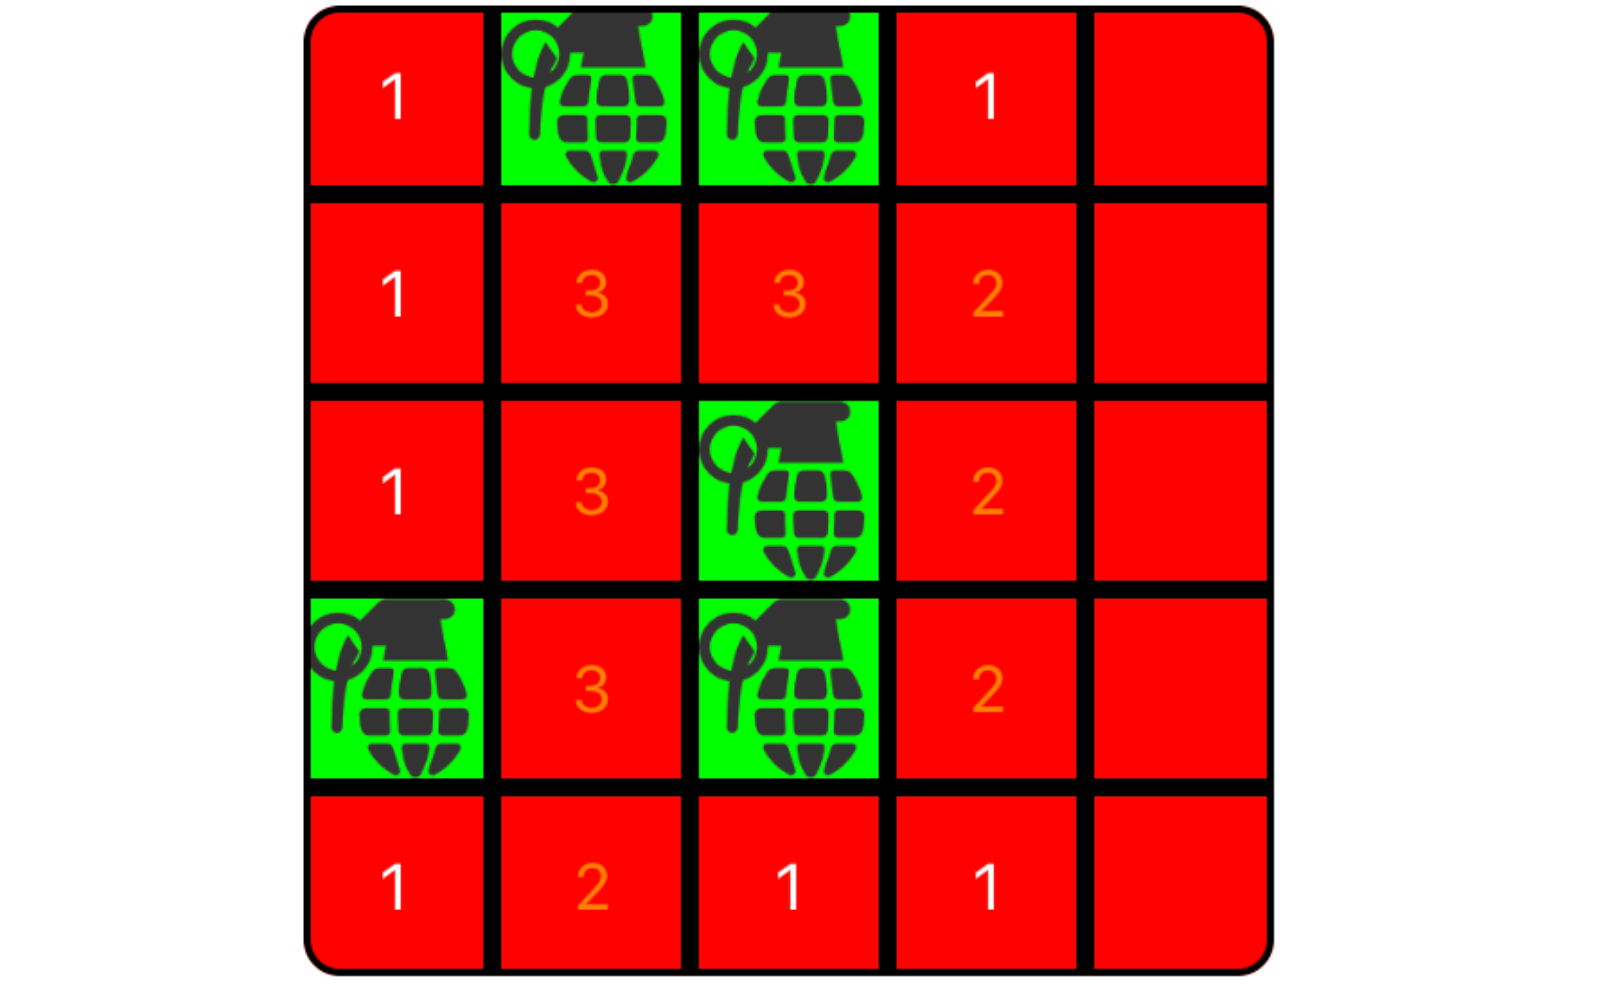
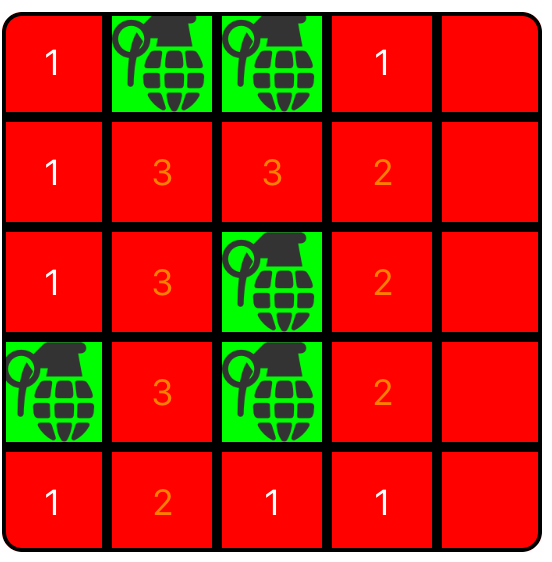
If we visualize these both things - Mines + Tiles with neighboring mines count denoted on them + Tiles without any sequence on it, it will look like this for 5 X 5 grid,
Mine Button
Before moving forward, let me write a little bit about the custom MineButton that I created for the sake of this game. In the picture above, the each tile you see is an instance of MineButton. It has following structure
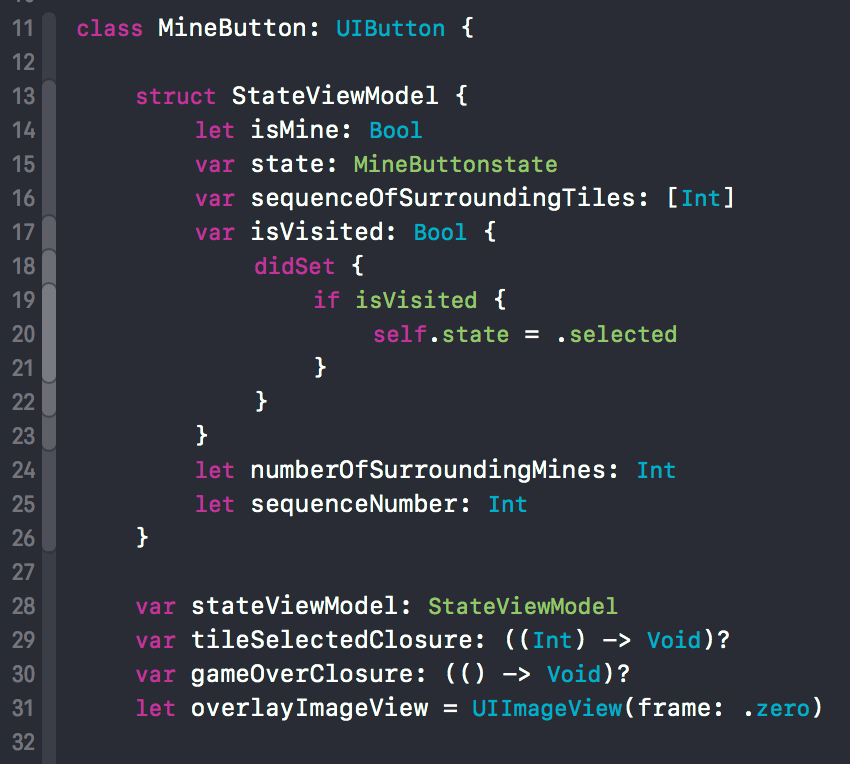
As you can see it too has a ViewModel associated with it. It stores properties such as whether tile is mine or not, sequence of surrounding mines, current state etc. It also has couple of closures for callback. One is used to trigger when tile is selected and other to trigger the end of the game in case selected tile turns out to be a mine.
It also has additional public methods which I haven't listed in the code above, but they are used for following purposes,
- Configuring button with information whether it's mine or not or updating title with number of adjacent mines
- Showing images of mines when user wants to
cheatin the game - Hiding the mind images as user
uncheatsthe game - Updating background color of tile based on the current state - Selected, unselected, question marked
Laying out views
This is the next step. We have all the small pieces, but how do we convert them into a real grid to display all those tiles on the viewport? Let's start laying out these views. First we need to things,
- Total grid dimension (length or width) in terms of pixels. We have a utility method on the
ViewModelto compute this value

2. Successive tile increment - To get the point where we will lay the next tile. This can easily be calculate from tileWidth and gutterSpacing

Let's look at the code to start laying out those views,
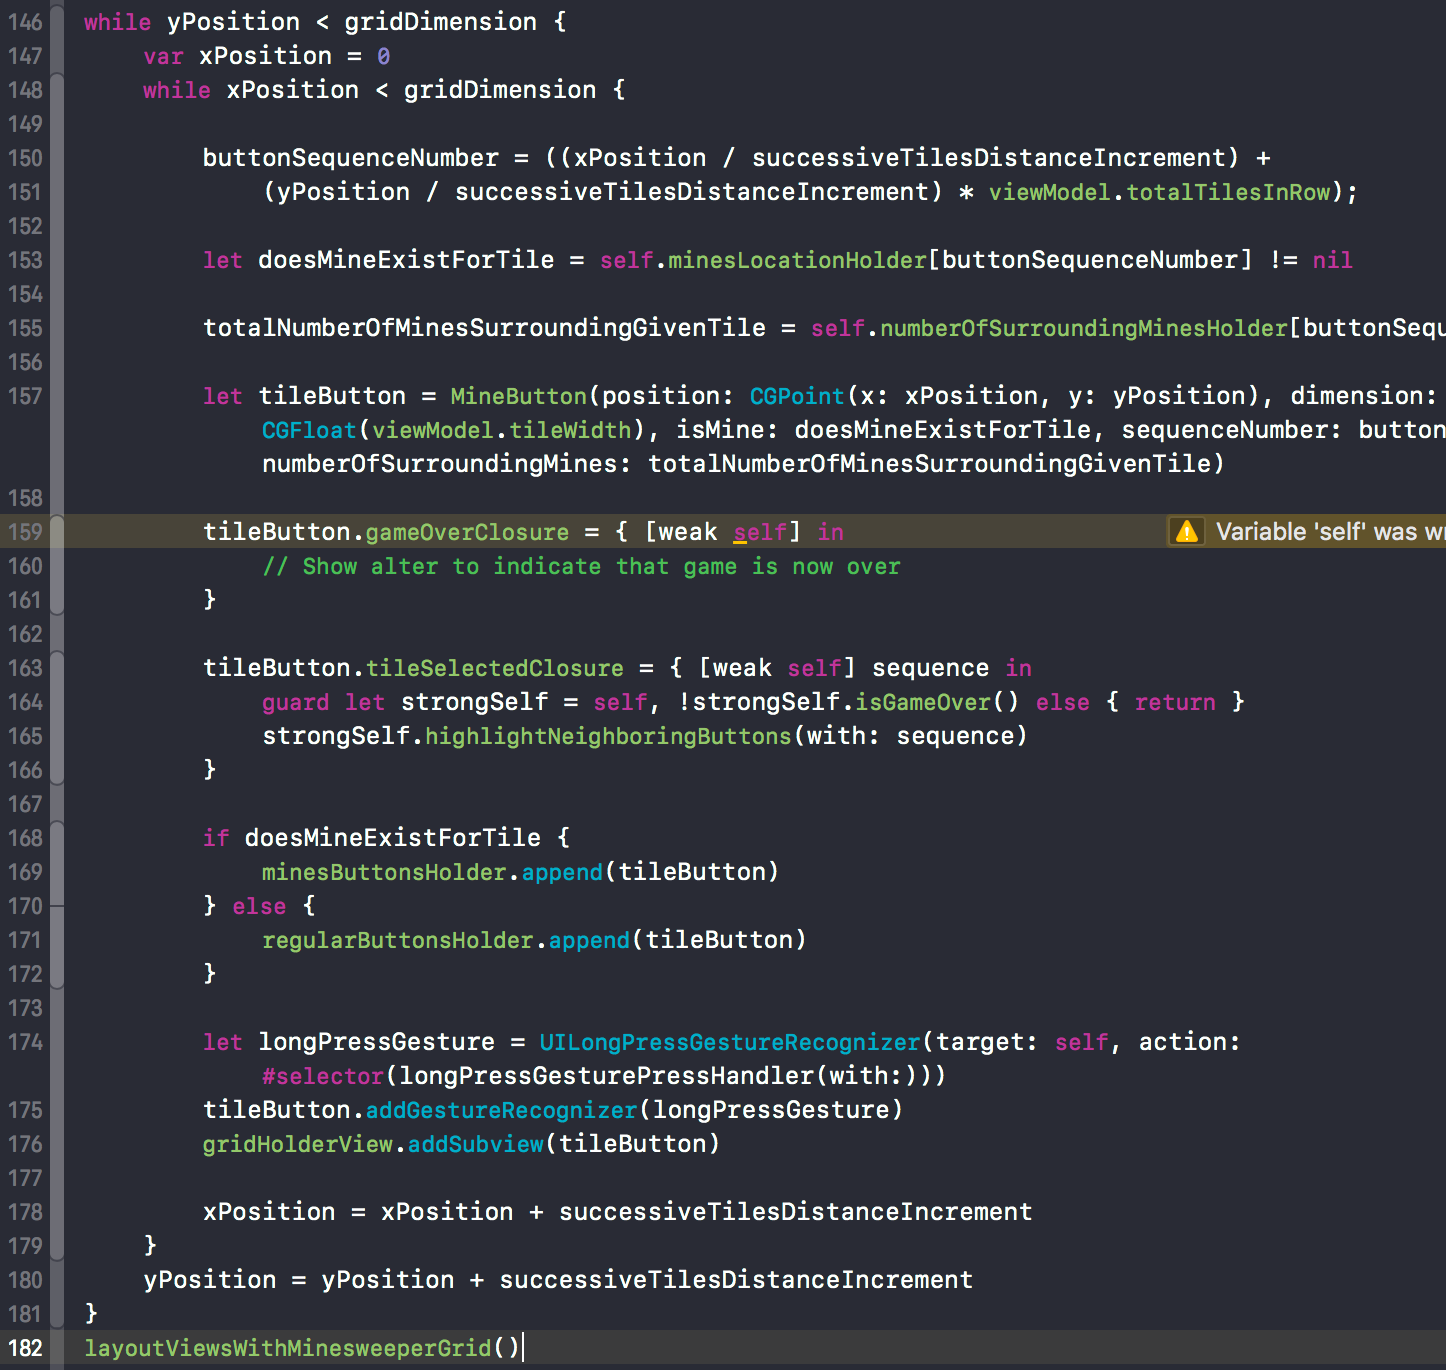
- We have two for loops set up to successively create and style successive tiles horizontally and vertically respectively
- On
Line 150we calculate the sequence number to assign to the tile. This number lies between0-pow(numberOfTilesInRow, 2) - Next we check if that sequence number exists in the
minesLocationHolder. If it does, this sequence number belongs to mine - Next we query
numberOfSurroundingMinesHolderto get number of surrounding mines for the tile with given sequence number. This is important information for astateViewModelassociated with that tile - Next we set
gameOverandtileSelectedclosure to given tile. For game over, we will simply show the dialogue indicating that game is over. - For what happens when tile is selected, we will call another method
highlightNeighboringButtonsto recursively highlight neighboring tiles. This will be covered in later parts - Between
Line 168andLine 172we have another code which stores tiles in eitherminesButtonsHolderorregularButtonHolder. This is used when we want to enter cheat mode to reveal mines and also while highlighting surrounding tiles when user selects a tile other than the mine - On
Line 174we have an interesting thing. It adds the long press gesture to the tile. This is similar to the feature in original minesweeper where if user is not sure, they can right click to mark that tile withmaybemark and it looks like this,

9. As indicated on Line 178 and Line 180, we also keep incrementing x and y values by successiveTilesDistanceIncrement until we reach the boundary gridDimension set in both directions
10. Once everything is ready, we call the method layoutViewsWithMinesweeperGrid which is basically auto layout magic to lay grid and header nicely so that it looks good without violating any auto layout rules
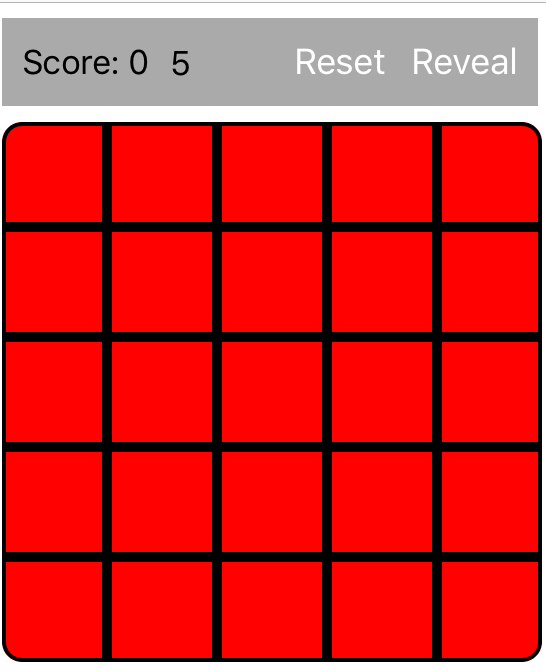
Finally, after everything, grid looks like this - RED being default tile color when it's in unselected state,
This is it for now. In the next blog post I will cover more things such as highlighting tiles when one is selected, cheat mode, and scoring features. Until later folks!

