iOS - Social Login - Twitter


I found dealing with Twitter SignIn interaction quite challenging until I found out about STTwitter Objective-C framework to deal login and sharing tasks related to Twitter.
You can install it by adding line
pod 'STTwitter', '~> 0.2'topodfileand runningpod installcommand
Here's how you can add Twitter login to your app :
First off, to begin with, go to Twitter Application management portal to register you app. It is very simple and would take only few moments. Once completed, you will get following items which you will utilize to communicate with Twitter server :
-
Consumer Key (API Key)
-
Consumer Secret (API Secret) Make sure to keep it secret
-
Callback URL - It will be used to jump into your app from WebView when Twitter login is successfully completed
For example, I am using myapp://twitter_access_tokens/ as my callback URL. You can choose any value pertaining to you app.
There are couple of things you will need to do as long as callback URL is concerned.
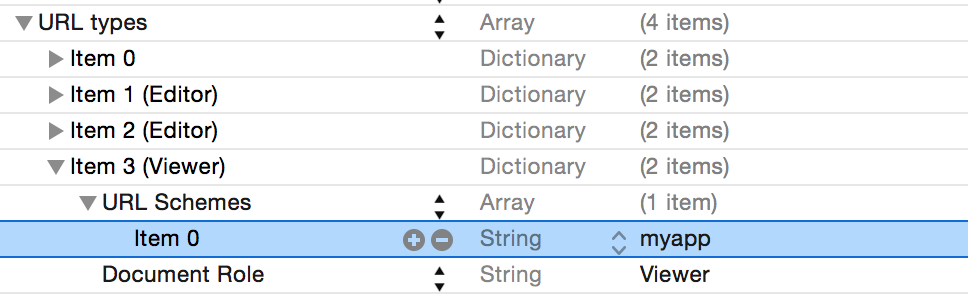
- App host name of a callback URL into your info.plist file as follows:
URL Types -> Item 0 -> URL Schemes -> Item 0 -> myapp
Here's the screenshot of plist file to make things more clear,
- You will also need to make changes to Application delegate to allow app to open Twitter authorization page in the UIWebView as follows:
- (BOOL)application:(UIApplication *)application openURL:(NSURL *)url sourceApplication:(NSString *)sourceApplication annotation:(id)annotation {
	if ([[url scheme] isEqualToString:@"myapp"]) {
        return YES;
    }
    return NO;
}
Now back to easy part,
Add STTwitter framework to you class where you plan to add Twitter login action as follows,
#import <STTwitter/STTwitter.h>
Also, maintain a STTwitterAPI object property into your class to handle rest of the login actions as follows,
@property(strong, nonatomic) STTwitterAPI* twitter;
and initialize STTwitterAPI object with your consumer key and consumer token,
self.twitter = [STTwitterAPI twitterAPIWithOAuthConsumerKey:CONSUMER_KEY consumerSecret:CONSUMER_SECRET];
To trigger twitter login, I have added a login button as follows,
- (IBAction)twitterLoginButtonPressed:(id)sender {
       [_twitter postTokenRequest:^(NSURL *url,
                                    NSString *oauthToken) {
           [[UIApplication sharedApplication] openURL:url];
    } authenticateInsteadOfAuthorize:YES
                          forceLogin:@(NO)
                          screenName:nil
                       oauthCallback:callback
                          errorBlock:^(NSError *error) {
                               NSLog(@"-- error: %@", [error localizedDescription]);
     }];
}
What above code does is that, it takes STTwitterAPI object initialized with auth token and secret and redirects user to Twitter Authentication web interface to input username and password.
Once your credentials are verified, it will land in the Appdelegate method,
- (BOOL)application:(UIApplication *)application openURL:(NSURL *)url sourceApplication:(NSString *)sourceApplication annotation:(id)annotation
We will extract oauth_token and oauth_verifier from this response as follows
NSDictionary* dataDictionary = [self parametersDictionaryFromQueryString:[url query]]; NSString *oauthToken = twitterTokenInfo[@"oauth_token"]; NSString *oauthTokenVerifier = twitterTokenInfo[@"oauth_verifier"];
next - use theis token verifier to post access token request,
[self.twitter postAccessTokenRequestWithPIN:verifier
      successBlock:^(NSString *oauthToken,
                     NSString *oauthTokenSecret,
                     NSString *userID,
                     NSString *screenName) {
                    [self.twitter getAccountVerifyCredentialsWithSuccessBlock:^(NSDictionary                                                       *account) {
        // This is where you'll get all account information for currently logged in user
            }
            errorBlock:^(NSError *error) {
              NSLog(@"Failed with error", [error localizedDescription]);
            }];
       [[NSUserDefaults standardUserDefaults]
            setValue:self.twitter.oauthAccessToken
              forKey:OAUTH_TOKEN_STORE_KEY];
        [[NSUserDefaults standardUserDefaults]
            setValue:self.twitter.oauthAccessTokenSecret
              forKey:OAUTH_TOKEN_STORE_SECRET];
      }
      errorBlock:^(NSError *error) {
          NSLog(@"-- %@", [error localizedDescription]);
      }];
On a side note you can store
oauthTokenandoauthTokenSecretin the persistent storage, so next time you want to authenticate the current user, instead of redirecting him to web interface, these authentication tokens could be utilized. When they wish to perform Twitter logout action, simply remove these tokens from relevant persistent storage.
In the above example, once STTwitterAPI object has oauthToken and oauthTokenSecret, relevant account details could be requested with simple call as,
[self.twitter getAccountVerifyCredentialsWithSuccessBlock:^(NSDictionary* account) {
	NSLog(@"All account Details %@", account);
} errorBlock:^(NSError *error) {
	NSLog(@"Failed with error", [error localizedDescription]);
}];
Once you get account details, they can be communicated via your own server for further authentication when needed.
I tried to achieve Twitter login directly with OAuth authorization without using
STTwitterinitially, but that failed so badly. Looks like STTwitter hides a lot of intricate details under hood which makes it so easy to work with Twitter authentication APIs.
This is the first article in the series Social Logins/Sharing. Next, I will write article on how to make app to share content on Twitter using same STTwitterframework.
Stay tuned!
Note: I have added demo project on GitHub Here. You can find application tokens in the project, but it's strongly recommended to create your own application. Also, please don't go too crazy with my auth key and secret :)

