SwiftUI Attributed Strings - Decoding and Applying Custom Remote Attributes with Markdown and Attribute Keys

One of the fancy attributed strings additions to iOS 15 has been a support for custom remote attributes with attribute keys via markdown format. How would you like if the server could define custom styles to strings in incoming JSON and the client would already know how to stylize them?
This is essentially what the new attributed strings API offers in iOS 15. Attributed strings with this new format look something like this,
^[string_to_decorate](attribute_key_1: attribute_value_1, attribute_key_2: attribute_value_2)
The iOS client already knows how to read attribute key-value pairs and how to decode them. This is what we're going to take a look at next.
Let's define a simple string with attribute key-value pairs coming from the server and we will see what client-side changes we need to make to decode and decorate strings with it.
let inputString = "^[Amsterdam](cityStyle: 'amsterdamStyle', cityColor: 'amsterdamColor') is a great city"
We define two attributes on the string "Amsterdam" - cityStyle with the value of amsterdamStyle and another attribute is, cityColor with the value of amsterdamColor. To read and apply these style requirements, we will make the following changes to our iOS app.
First, we will add two enums, one for each attribute. These enums will help us read attribute names and values as returned in the incoming markdown strings.
public enum CustomCityStyleAttributes: CodableAttributedStringKey, MarkdownDecodableAttributedStringKey {
    public enum Value: String, Codable {
        case amsterdamStyle
    }

    public static var name = "cityStyle"
}

public enum CustomCityColorAttributes: CodableAttributedStringKey, MarkdownDecodableAttributedStringKey {
    public enum Value: String, Codable {
        case amsterdamColor
    }

    public static var name = "cityColor"
}
Due to iOS requirements, we need to make both enums conform to CodableAttributedStringKey and MarkdownDecodableAttributedStringKey. Under value, we define one or more values associated with attributes. Since in this case, we have only one value for each attribute we define only one case for Value enum.
Next, we will combine these attributes under an umbrella attribute struct with the name CustomCityAttributes. This struct conforms to AttributeScope and is added as an extension on AttributeScopes.
public extension AttributeScopes {
    struct CustomCityAttributes: AttributeScope {
        let customCityStyle: CustomCityStyleAttributes
        let customColorStyle: CustomCityColorAttributes

        let swiftUI: SwiftUIAttributes
    }

    var customCityAttributes: CustomCityAttributes.Type  { CustomCityAttributes.self }
}
SwiftUIAttributes. It represents built-in SwiftUI attributes in addition to our custom attributes. We can add as many custom attributes as we like under this parent attribute scopeWe will use customCityAttributes as a key-path to decode the incoming string into an attributed string that iOS can parse to apply styles over.
Now that we have all the basic building blocks for parsing a string, we will use the incoming markdown string from server and custom attributes on the client side to convert it into a AttributedString struct.
let inputString = "^[Amsterdam](cityStyle: 'amsterdamStyle', cityColor: 'amsterdamColor') is a great city"

let customAttributedInputString = (try? AttributedString(
    markdown: inputString,
    including: AttributeScopes.CustomCityAttributes.self,
    options: AttributedString.MarkdownParsingOptions(allowsExtendedAttributes: true))) ?? AttributedString(inputString)
AttributedString instance using custom CustomCityAttributes. If, for any case, the initialization fails, we will fall back to the regular AttributedString initializer. If the fallback happens, no custom attributes will be applied and the string will be displayed as it was received from the serverCreating a View to Display the Attributed String
Now that we have an attributed string, let's make a view that will show it on the UI. Out view will accept this attributed string through an initializer and the view's body will pass it to the Text instance to show in the app.
Our code will have two structures
CustomAttributedStringTextView- Main SwiftUI view to display the attributed string applying all the available attributesCustomAttributedStringTextViewModel- A view model to construct the instance ofAttributedStringafter reading the markdown string
import SwiftUI

struct CustomAttributedStringTextViewModel {

    let customAttributedInputString: AttributedString

    init() {

        let inputString = "^[Amsterdam](cityStyle: 'amsterdamStyle', cityColor: 'amsterdamColor') is a great city and ^[regular rainbow style](rainbowStyle: 'regular') awesome city to live in ^[first half rainbow style](rainbowStyle: 'firstHalf') or ^[second half rainbow style](rainbowStyle: 'secondHalf')"

        self.customAttributedInputString = (try? AttributedString(
            markdown: inputString,
            including: AttributeScopes.CustomCityAttributes.self,
            options: AttributedString.MarkdownParsingOptions(allowsExtendedAttributes: true))) ?? AttributedString(inputString)

    }
}

struct CustomAttributedStringTextView: View {

    let customAttributedStringTextViewModel: CustomAttributedStringTextViewModel

    init() {

        self.customAttributedStringTextViewModel = CustomAttributedStringTextViewModel()

    }

    var body: some View {
        Text(customAttributedStringTextViewModel.customAttributedInputString)
            .padding()

    }
}
Output:

If you run the app, you will see the plain string without any markdown attributes surrounding it. They are stripped during the following call.
try? AttributedString(
    markdown: inputString,
    including: AttributeScopes.CustomCityAttributes.self,
    options: AttributedString.MarkdownParsingOptions(allowsExtendedAttributes: true))
This is a failable initializer. In case we aren't able to parse the incoming markdown, we fall back to using the default AttributedString initializer.
(try? AttributedString(
    markdown: inputString,
    including: AttributeScopes.CustomCityAttributes.self,
    options: AttributedString.MarkdownParsingOptions(allowsExtendedAttributes: true))) ?? AttributedString(inputString)
We still don't see any styles applied to incoming markdown. This is because we haven't defined any styles to apply to incoming markdown. When the app sees amsterdamStyle and amsterdamColor, it still doesn't know which special fonts and colors to apply to them. We will add them in the next step.
Adding Custom Styles to Attributed String as Dictated by Markdown
In this step, we will add a code to actually apply attributes and styles as dictated by the incoming markdown format. We will add customStyledAttributedString function which will inspect the incoming attributed string and apply styles to it as needed which is dictated by markdown syntax.
private func customStyledAttributedString(input: AttributedString) -> AttributedString {

    var output = input

    for run in output.runs {

        let customCityAttributes = run.customCityAttributes

        guard customCityAttributes.customCityStyle != nil || customCityAttributes.customColorStyle != nil else {
            continue
        }

        let range = run.range

        if let customCityStyle = customCityAttributes.customCityStyle {
            if customCityStyle == .amsterdamStyle {
                output[range].font = .largeTitle
            }
        }

        if let customColorStyle = customCityAttributes.customColorStyle {
            if customColorStyle == .amsterdamColor {
                output[range].foregroundColor = .orange
            }
        }
    }

    return output
}
Now that this function is ready, we will utilize it to apply attributes to incoming strings before showing it on the view. For reference, our input markdown string is,
"^[Amsterdam](cityStyle: 'amsterdamStyle', cityColor: 'amsterdamColor') is a great city"
var body: some View {
    Text(customStyledAttributedString(input: customAttributedStringTextViewModel.customAttributedInputString))
        .padding()
}
As you can see, as "Amsterdam" was wrapped inside custom style and color, we applied styles specific to these values through the code and we successfully bridged the gap between markdown and styles applied from the code.
Custom Attributes with Attribute Keys - Advanced Level
Now that our basic understanding of custom attributes and keys is clear, let's go on and add advanced attributes to the string.
In the next section, we will add a rainbow theme to our text. There are three versions of the rainbow theme. The markdown will dictate the rainbow style to apply and which specific style value to use. The app will accommodate this by adding code to recognize when the rainbow style is specified and will read which value to apply to substrings wrapped in the markdown.
Changing Input String
First, we will change our markdown string to specify which rainbow styles to use for which substrings.
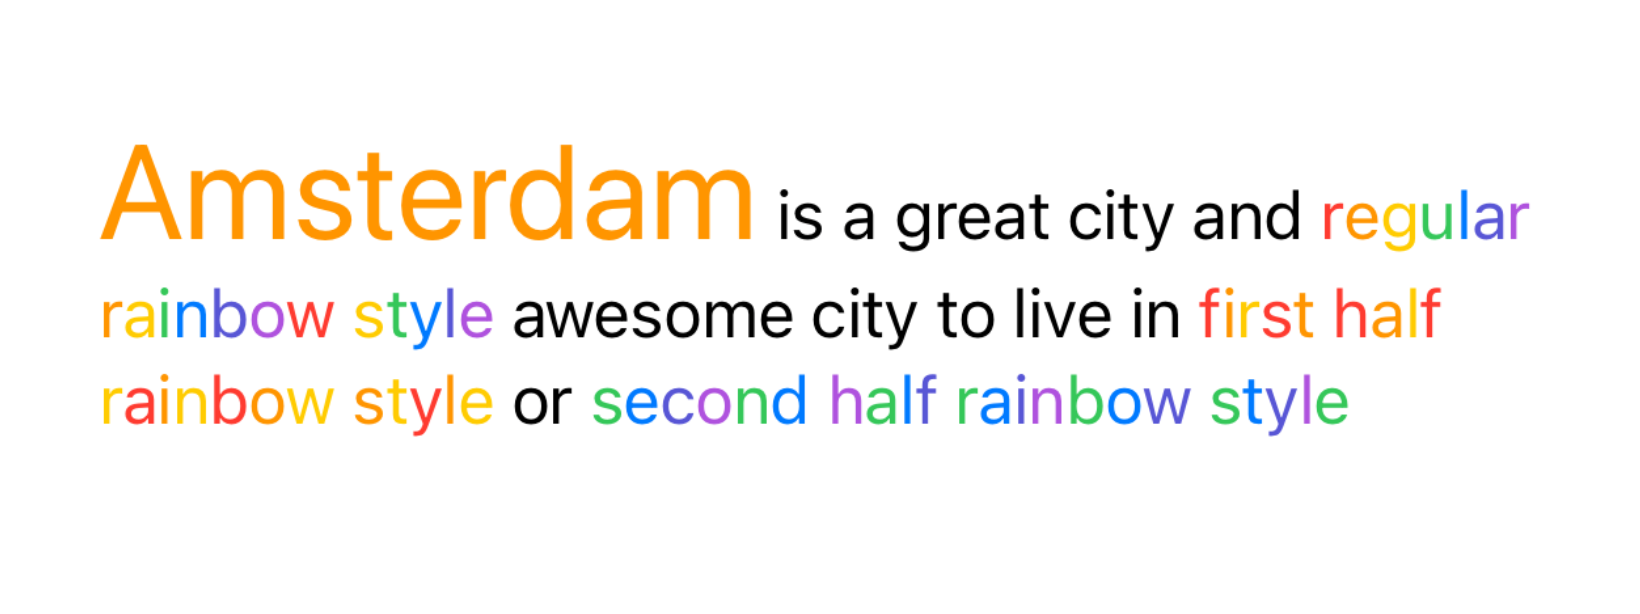
let inputString = "^[Amsterdam](cityStyle: 'amsterdamStyle', cityColor: 'amsterdamColor') is a great city and ^[regular rainbow style](rainbowStyle: 'regular') awesome city to live in ^[first half rainbow style](rainbowStyle: 'firstHalf') or ^[second half rainbow style](rainbowStyle: 'secondHalf')"
Adding new Custom Rainbow Style Attribute
Next, we will add a new CustomRainbowStyleAttributes attribute conforming to CodableAttributedStringKey and MarkdownDecodableAttributedStringKey. The attribute name is rainbowStyle and there are 3 possible values associated with it.
public enum CustomRainbowStyleAttributes: CodableAttributedStringKey, MarkdownDecodableAttributedStringKey {
    public enum Value: String, Codable {
        case regular
        case firstHalf
        case secondHalf
    }

    public static var name = "rainbowStyle"
}
Now that we added a new style, we will also add it to existing CustomCityAttributes struct
struct CustomCityAttributes: AttributeScope {
    let customCityStyle: CustomCityStyleAttributes
    let customColorStyle: CustomCityColorAttributes

    // New styles
    let customRainbowStyle: CustomRainbowStyleAttributes

    let swiftUI: SwiftUIAttributes
}
The rest of the code in this struct remains as it is.
Adding Attributes for Rainbow Styles
If we run the app now, we still won't see new rainbow styles applied to the input strings marked with rainbow styles.
We will fix them by adding one more piece of code inside customStyledAttributedString method which will define where and how the rainbow styles should be applied. Markdown also specifies the value of this attribute so will apply different styles for each value.
Let's add this code at the end of customStyledAttributedString method.
private func customStyledAttributedString(input: AttributedString) -> AttributedString {

    var output = input

    for run in output.runs {

        .....
        ...
        .......
        ...

        let range = run.range

        .....
        ...

        if let customRainbowStyle = customCityAttributes.customRainbowStyle {

            let rainbowColorsCollection: [Color]

            switch customRainbowStyle {
            case .regular:
                rainbowColorsCollection = rainbowColorsCollectionFull
            case .firstHalf:
                rainbowColorsCollection = rainbowColorsCollectionFirstHalf
            case .secondHalf:
                rainbowColorsCollection = rainbowColorsCollectionSecondHalf
            }

            var integerIndex = 0
            for i in output[range].characters.indices {
                output[i..<output[range].characters.index(after: i)].foregroundColor = rainbowColorsCollection[integerIndex % rainbowColorsCollection.count]
                integerIndex += 1
            }
        }
    }

    return output
}
Since we are applying different ranges of rainbow colors to input strings based on the value, we will define three rainbow color collections to use.
private var rainbowColorsCollectionFull: [Color] {
    [.red, .orange, .yellow, .green, .blue, .indigo, .purple]
}

private var rainbowColorsCollectionFirstHalf: [Color] {
    [.red, .orange, .yellow]
}

private var rainbowColorsCollectionSecondHalf: [Color] {
    [.green, .blue, .indigo, .purple]
}
Rainbow Style Demo
Now that all the pieces are ready, let's run the app and see the applied styles in action.
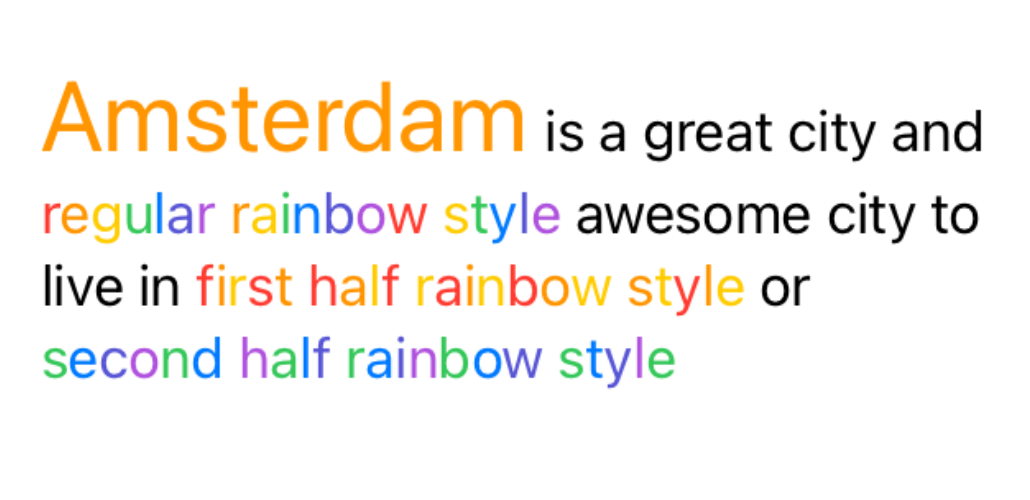
And that's it! Once the basic infrastructure is set up, adding new styles or editing existing styles is just a few minutes of work.
Summary
So this was all about to know when it comes to applying custom remote attributes with markdown attribute keys. Although it was hard to understand this idea when presented in WWDC, I found a way to implement and play with it with real examples.
Now that I get how it works, I have a firm belief that this could be a pretty phenomenal idea when it comes to applying dynamic styles in the app, especially when everything from the content, business logic to design is moving to the server side. Have you got a chance to play with it yourself? How did you like it? Are there any improvements you would like to see in this API? Reach out to me on Twitter at @jayeshkawli with your thoughts.
References