Using Custom Environment Key-Values in SwiftUI with Examples

SwiftUI offers flexibility in many different ways. One of the ways it does this is, its ability to create a custom environment key-value pair. These are nothing but a collection of environmental values propagated through a view hierarchy.
When you don't want to pass down values through a multiple view hierarchy, it allows you to define the default environment value just once which can be used anywhere in the app as long as that location has access to the environment key of that variable.
SwiftUI provides many built-in environment keys that make building apps much easier without having to pass those values down to every view that needs it.
You can find a list of all properties provided through the environment value by visiting this link. These are all observable properties and any time their value is changed, it triggers the view redrawing and updates anywhere they're used.
However, environment values aren't limited to built-in Apple types. We can also define our own custom environment key values and use them anywhere in the app.
This value can be either overridden or set for a specific component. Any time value isn't specified, it will use the default value associated with that environment key.
Creating Custom Environment Values
In order to make custom environment values, first, you need to make the associated custom environment key. We need to make the environment key conform to protocol EnvironmentKey and define its default or the initial value. This value acts as a placeholder if the app is not overriding it anywhere else.
In our case, we will define Style type as the environment value which will have two properties, foregroundColor and backgroundColor which together will represent the current theme. We will use BaseStyle as a default value for this environment.
protocol Style {
    var foregroundColor: Color { get }
    var backgroundColor: Color { get }
}

struct BaseStyle: Style {
    var foregroundColor: Color {
        Color.black
    }

    var backgroundColor: Color {
        Color.white
    }
}

private struct MyStyleEnvironmentKey: EnvironmentKey {
    static let defaultValue: Style = BaseStyle()
}
Now, we will extend the EnvironmentValues to include a value associated with the environment key MyStyleEnvironmentKey. This will allow us to get and set the value associated with this custom environment key.
extension EnvironmentValues {
    var myStyleEnvironmentValue: Style {
        get { self[MyStyleEnvironmentKey.self] }
        set { self[MyStyleEnvironmentKey.self] = newValue }
    }
}
Every time we set this value, it gets assigned to a value associated with MyStyleEnvironmentKey key in the environment and similarly, every time we try to get this value, it returns the value associated with MyStyleEnvironmentKey environment key.
The app can globally override this value at any time just by changing the value associated with this key in the environment.
environment(\.myStyleEnvironmentValue, <custom_style_value>)
However, this is a hassle and we need an ability to be able to set this value per-view basis.
As soon as we apply this environment value to a view, it automatically gets applied to all its descendants starting the point where this value is changed
Let's define an extension on View type that will enable us to change the theme on any view that we want as follows,
extension View {
    func myCustomEnvironmentStyleValue(_ myCustomEnvironmentStyleValue: Style) -> some View {
        environment(\.myStyleEnvironmentValue, myCustomEnvironmentStyleValue)
    }
}
Now, this value can either be set globally or can be changed anywhere in the app and applied to the view and all its descendants on which it is applied.
Usage and Application
Now that we have a basic understanding of environmental values and keys, let's take a look at it with some examples. To make things more interesting, let's define two more styles in our app. Golden and Green
struct GoldenStyle: Style {
    var foregroundColor: Color {
        Color(red: 1, green: 0.843, blue: 0, opacity: 1.0)
    }

    var backgroundColor: Color {
        Color(red: 0.878, green: 0.043, blue: 0.345, opacity: 1.0)
    }
}

struct GreenStyle: Style {
    var foregroundColor: Color {
        Color(red: 0.67, green: 0.792, blue: 0.502, opacity: 1.0)
    }

    var backgroundColor: Color {
        Color(red: 0.345, green: 0.0313, blue: 0.235, opacity: 1.0)
    }
}
To read a value from the structure, we are going to declare a property using the Environment property wrapper and specify the value’s key path on the top. Then, we can access the environment value just by referring to that property. Unless the property was overridden some other way, we get the default value.
This is what our test view will look like,
struct MyTestView: View {
@Environment(\.myStyleEnvironmentValue) var style: Style
var body: some View {
VStack {
Text("Welcome to Test Screen\n")
Text("On this screen you will do a lot of experiments\n")
Text("We will be there with you. Enjoy\n")
}
.foregroundColor(style.foregroundColor)
.background(style.backgroundColor)
}
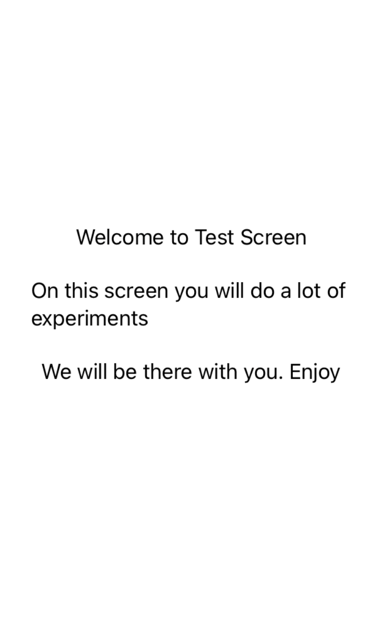
}Since we're using the default style, the screen will appear like this,
If I want to change the appearance by passing some different style, I can directly override the environment value from the place where I am initializing this view.
MyTestView()
    .environment(\.myStyleEnvironmentValue, GoldenStyle())

// OR

MyTestView()
    .environment(\.myStyleEnvironmentValue, GreenStyle())
And the view will look like one of these screens depending on which style is used.


This isn't limited to the entire screen though. You can also override the environment values per-subview or per-component basis and changes will be reflected only at the place where this value is overridden.
How to Change App Theme Colors on the Fly
It's a pretty usual use case where the user changes the app theme, configuration, or settings while the app is running and we want to reflect this change throughout the app without restarting the whole app. CustomSwiftUI environment key-values allow us to do that.
We can create a singleton conforming to ObservableObject and a Published Style property that will allow us to observe any changes to style. We can then pass this published property to the root view. Every time the style is changed by the user, we will update this published property. Since it's a combination of global environment value and observed property on it, any changes to the style in one place will reflect everywhere in the app using that style.
// Create a shared app environment with a published
// property Style. We will also initialize this
// property to a BaseStyle

final class AppEnvironment: ObservableObject {
    static let shared = AppEnvironment()

    @Published var style: Style

    init(style: Style = BaseStyle()) {
        self.style = style
    }
}
We will pass the style associated with this singleton at the place where it initializes the root view.
@ObservedObject var environment = AppEnvironment.shared

MyTestView().environment(\.myStyleEnvironmentValue, environment.style)
Since the style is a published property on ObservableObject environment, any changes to it will also update the style for MyTestView and all its subviews.
Every time user updates the style, we also need to assign the newly selected style value to style property on the singleton environment object. To be able to do that from view, we will also pass the environment as an environment object to our view. (Or any other view that will be responsible for changing app style on the fly after the user selection)
...
..
@ObservedObject var environment = AppEnvironment.shared
...
..

MyTestView()
.environment(\.myStyleEnvironmentValue, environment.style)
.environmentObject(environment)
On the test screen, we will also provide controls that will allow users to choose any style they want to apply to the app. As soon as the style is chosen, it will be applied to the rest of the app in the form of an environment variable.
We will add these two lines on the top of our test screen to be able to access both environment variables and the environment object.
struct MyTestView: View {

    @Environment(\.myStyleEnvironmentValue) var style: Style
    @EnvironmentObject var environmentObject: AppEnvironment

}
We will also add a couple of more sections,
- First, to allow users to change the style configuration
- Second, regular screen content decorated using the currently selected style
Once the user selects the desired style, we will update the style property of ObservedObject environment and the change will automatically propagate to all the locations using the style.
var body: some View {

    // Change the current app style

    Button("Default Style") {
        environmentObject.style = BaseStyle()
    }

    Button("Golden Style") {
        environmentObject.style = GoldenStyle()
    }

    Button("Green Style") {
        environmentObject.style = GreenStyle()
    }

    // Regular screen content decorated using Style

    VStack {
        Text("Welcome to Test Screen\n")
        Text("On this screen you will do a lot of experiments\n")
        Text("We will be there with you. Enjoy\n")
    }
    .foregroundColor(style.foregroundColor)
    .background(style.backgroundColor)
}
Running the App and Dynamically Updating the Style
Now that everything is ready, let's run the app and dynamically update the style and see how it affects the general app appearance. I have also added a title on the top to display the name of the currently chosen style.
As you can see in the app, we have three built-in styles - Base, Golden, and Green. These styles are observed throughout the app and every time the user updates the style, it gets updates the style property on the ObservedObject environment and the change reflects everywhere using MyStyleEnvironmentKey environment key-value pair.
Where Can You Use This Technique?
This technique is useful when you have a configuration that is used throughout the app and you want to update all the configuration call sites from a single location without manually updating them. For example, style, fonts, colors, or endpoints.
In short, any change that affects the whole app but you still don't want to make that update manually.
Use EnvironmentValues feature in the app any time you want to manage and update the global state from a centralized location. Only single line change propagates that change throughout the whole app without additional overhead
The Source Code
The full source code for this tutorial is available on this Github link. This includes the creation of Styles, AppEnvironment and test screen MyTestView. If you find any bugs, issues, or scope for enhancement, please let me know on Twitter.
Summary
So this concludes our blog post on how to use and leverage EnvironmentValues in SwiftUI app. I hope that now you understand where and how to use it in the app. If you have still other questions about this blog post or the source code, please feel free to reach out to me on Twitter handle @jayeshkawli

